
by Alenka Lovy
What is confocal microscopy?
Reading and thinking about cell biology is very interesting no doubt, but I find that to be able to see biological processes by live microscopy just amplifies the questions at hand so much! Have you ever seen movies of cells dividing? I remember when I first did. It was hard to go from the picture perfect diagrams of the textbook to the real thing, but after a few times of watching the movies I saw the perfect (or not so perfect) progression through all the steps. Maybe it was the timing of it, or just being able to see the tangle of chromosomes trying to line up, and then the sudden division, I found it so breathtaking! Live cell microscopy has been my tool of preference to answer many biological research questions ever since.
Confocal microscopes in particular are powerful because they optically slice through a specimen (even live cells) and allow 3D image reconstruction in up to four different fluorescent channels. Confocals are built to scan point by point through your sample using laser light, and image just one particular plane of focus. This is very different to the standard fluorescent microscope which illuminates and images the entire sample at once, including out-of-focus light. The confocal is used to obtain clearer images of subcellular details that cannot be imaged with the fluorescent microscope and is especially useful for co-localization studies. There are many exciting techniques you can use with the confocal including fluorescence recovery after photobleaching (FRAP) with which you can observe protein mobility and recovery, fluorescence resonance energy transfer (FRET) which can show protein interactions, as well as photoactivation/uncaging studies.
BOX 1: What confocal can do for you (and your mitochondria)
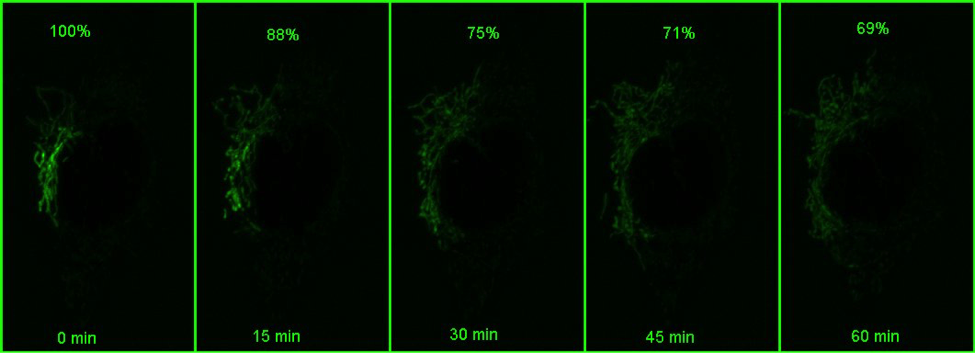
Using a photoactivatable GFP targeted to the mitochondria to measure mitochondrial fusion is a nice demonstration of the precision and quantitation that can be achieved using a confocal. Mitochondria are amazingly motile and networked and look like spaghetti . They also undergo constant fission and fusion, which can be difficult to capture. The top panel in the figure below shows the mitochondrial network (z stack) labeled with TMRE in Hela cells imaged every 15 min for 1 hr. It is impossible to capture which mitochondria are fusing.
However, if a small portion of the network is photoactivatedand then imaged in z stacks over time, the signal can be monitored over time (bottom panel in the above figure). As the mitochondria fuse, the GFP protein becomes diluted in the larger volume of the network that has not been photoactivated, and the extent of dilution can be quantified and used as a measure of mitochondrial fusion.
What facilities does Tufts have for confocal microscopy and other imaging techniques?
The Tufts Imaging Facility has four confocal microscopes and most are equipped with the standard 405nm, 488nm, 561nm and 633nm laser lines, which is important to know when choosing fluorophores. Using the Fluorescence SpectraViewer online will help you determine if the emission spectra of your fluorophores overlap such that crosstalk between them can be minimized. We have two inverted microscopes equipped for live cell imaging, and two upright microscopes that are usually used for fixed samples and 3D reconstructions. While imaging living cells, you can use an automated focusing mechanism which employs an infrared laser that keeps track of the coverslip, and therefore your sample. If you’ve ever had to adjust the focus yourself over several hours, you know just how powerful this feature is!
The Nikon A1R inverted confocal has a resonant scanner capable of high speed imaging (500 frames/sec at 512×512 pixel resolution) suitable for ion imaging and is being used for calcium imaging in cardiomyocytes. It also comes in handy during very long tiled scans with z-stacks, and although the image quality is slightly sacrificed, depending on the resolution needed, the gain in speed may well be worth it.
The Leica SP8 inverted confocal has a HyD sensitive detector and can be used with very low laser powers allowing longer imaging of easily bleached samples. For example, measuring how quickly a photoactivated GFP spreads within the mitochondrial network every minute over an hour would bleach the signal before all the information was collected on a regular detector compared to a HyD detector.
Another good technique to avoid bleaching in live cell imaging is to use the total internal reflection microscope (TIRFM). On this microscope, you can adjust the angle of laser light with which you illuminate your sample. There is a particular angle at which all the laser light is internally reflected, except for a 100nm evanescent wave. With this you can then image processes close to the membrane, such as receptor insertion/cycling. Very often you can image a little bit deeper than the 100nm, and because the laser is at an angle, you will not bleach your specimen as fast. As opposed to confocal, the TIRF system has a sensitive EMCCD camera, enabling faster imaging (I have been looking at calcium sparks at 50 ms/frame).
The Leica upright microscope has water immersion objectives that have a large working distance and work well for thick cleared samples such as mouse brains or zebrafish embryos.
Finally, in addition to standard fluorescent microscopes, we also have the automated Keyence fluorescence microscope which can scan up to 3 slides and stitch large images together in four channels as well as in brightfield. If large tiled scans are needed, this may be the instrument of choice due to the speed and ease of use.
For more information about the instruments in the Tufts Imaging Facility, please visit our website. If you would like to use an instrument or need help planning an experiment please email me at:
If you’d like to learn more about microscopy in general, the Molecular Expressions Microscopy Primer is a great resource.