This by far was the most intimidating project to delve into as I not only had no previous experience with circuits, but also had never coded beyond MATLAB. Since the idea of utilizing C++ and microcontrollers seemed daunting, I decided to start off small and build-up based on how things went.
To start, I had the idea of creating an Automated Night Light that would utilize a Photoresistor/Light-Dependent Resistor (LDR) as a sensor for light that would activate an LED when it’s dark. I thought exploring LDRs and Automated Night Lights would be pretty neat as it is a very practical product that would be popular among users (we’ve all been too lazy to get out of bed and turn on the light!).
Given my lack of experience with circuits and the fact that I have yet to take the circuits class at Tufts, I decided to first take the time to familiarize myself with the basics of breadboards though this YouTube video. From this video I learned the basic, but very important features, of breadboards. For instance, I learned that although each column is connected, the same is not true for the rows, which must be connected through wires. I also learned how the longer leg of the LED, which is the positive cathode, must be connected to the resistor.
With a better understanding of circuits, I used the following video to coach me through my first attempt at making the Automated Night Lamp.


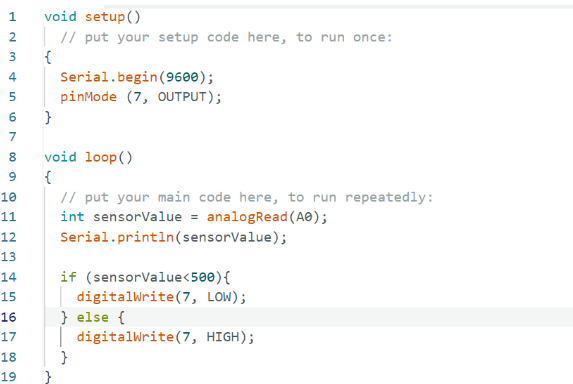
When I first ran the code, the LED lit up, however, was very flickery. Thus, I lowered the ‘sensorValue’ in the code from 200 to 50 to make the photoresistor more sensitive. However, even then, I kept running into a variety of issues with this setup, everything from having the opposite effect, to random lighting of the LED.
Frustrated, I decided to find a completely different tutorial to follow.

Even with this tutorial, I ran into issues with achieving the intended effect. That’s when I remembered you can actually see what the light sensor is detecting through the serial monitor feature in Arduino. By enabling this feature, I noticed that the sensor would, on average, output numbers of over 1000 when exposed to light, and below 1000 when I made it dark by covering the sensor with my finger. With this finding, I changed the ‘sensorValue’ in my code to 1010 (a little more than 1000 to give some wiggle room).
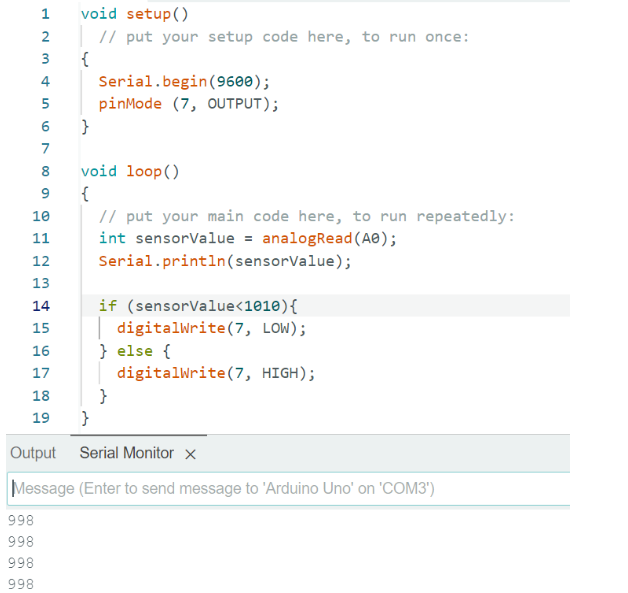
With the adjustment to the code, my LED finally exhibited the intended effect of being lit when dark and off when the sensor is exposed to light. With a working base, it was now time to add some of my own modifications!
First, I began by adding another LED to have more than just one-color light up in my night lamp. Since I had watched a video on the basics of breadboards, and now had actual experience building a circuit, I decided to challenge myself and attempt to build the circuit for my second, blue LED without referencing the original circuit for the red LED as much as possible. To my surprise, I successfully built this second circuit on my first attempt and with very minimal referencing to the original circuit.
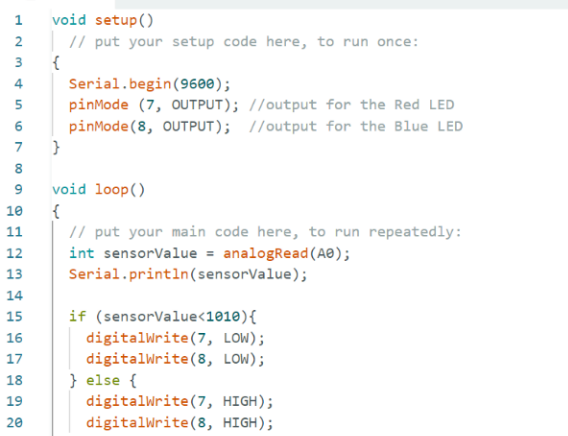

With this success, I decide to make yet another modification. Given the two differently colored LEDs, I modified the Arduino code so that when it is dark, the blue LED will turn on, but when it is light, the red LED will turn on. The rationale behind this was that in an automated lamp, the blue light can serve to relax the user at night and during the day, the red light can help the user become in a state of alertness.
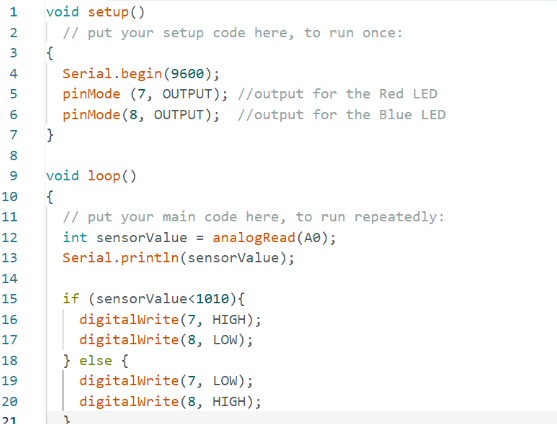
And with that, I had completed my Arduino & Microcontroller Project — an Automated Night AND Day Lamp that serves to both relax and alert the user when appropriate!
Through this project I not only learned the basics of creating circuits, but the importance of adjusting your Arduino code to accommodate your specific environment. With my first failed model, for example, the issue likely laid in the code and not the configuration of the board. I even noticed that different parts of the room outputted different numbers by the sensor! This shows the importance of making adjustments to specifically meet the needs of your very unique environment.
Below is the diagram of the completed breadboard I used to create my final dual functioning, automated LED Lamp.

There are many uses for microcontrollers in one’s life. For example, my project has real life implications in that it can be replicated on larger scale to serve as an actual automated night and day lamp for relaxation and alertness. Overall, microcontrollers help automate tasks and monitor conditions. For instance, they can monitor and control home temperatures, turning on a fan if it gets too hot, can help create a motion activated alarm for security, and even act as a parking sensor by detecting nearby obstacles around a car, among many other uses!