By Sarah Matheny, Alumni of the Teacher Engineering Education Program (TEEP)
Sarah Matheny, Science and Design Thinking Teacher from St. George’s Independent School,
Germantown, TN, shares the work done by a 4th grade class called “The Cardboard Boat Project”
Our fourth graders study explorers in the Fall and this year the teachers thought it would be fun to have our students make their own boats that they could actually float in… out of cardboard! This project sounded exciting and scary at the same time. The teachers assured me it could be done and all would be fine!
I had a few things I was worried about:
- Could I find enough flat sheets of cardboard for 15 boats?
- Can 2-3 children sit in a cardboard boat and it not buckle?
- Will duct tape be enough to secure the pieces together?
- How long can a cardboard boat last?
- How will we get all of these boats to the pool?
I went searching for information and, lucky me, there is a ton out there about making cardboard boats. Apparently, this is a thing! Country clubs, civic organizations, and high schools all seem to have competitions on making cardboard boats and there were lots of variations. Some were painted, some used caulk, some were covered in a rubberized coating. So, I knew it could work, but I had to decide what my goal would be for this project and set up my constraints. After talking with the fourth grade teachers again, we agreed that tape and cardboard should be the only materials. It would allow for the final boat to be made in one afternoon, and every student would be familiar with the materials. The challenge would be to use the 2 materials in a way that would last the longest and hold the weight of the group.
The overall process/lesson structure went something like this:
There were 3 classes of roughly 15 students. These classes would work together in fluid groups during Innovation Lab learning about the materials and trying out ideas. They would work in different groups for each lesson. On the actual boat making day, students from the 3 classes would be mixed and new groups would be made across classes. So, on boat making day, they would need to discuss what they learned from previous classes and make decisions about their design that day. So, all of the boat designs were fresh, newly planned.
Innovation Lab Lesson/Explorations:
Lesson 1- How does water and cardboard interact?
Lesson 2- Is there a way to STOP or SLOW water from disintegrating the cardboard using only 1 type of tape?
Lesson 3- Does the shape of the boat matter? Will it hold our weight? (Let’s make one to test on a pond, using what we have learned so far.)
Lesson 4- How do I get the boat I have in my head, cut out but with the fewest amount of pieces? Less seams, less exposed corrugation?
Lesson 1, students started working through understanding the materials by constructing a small boat. We watched how the corrugation could draw up the water fairly quickly.
Lesson 2, students tested how keeping just that corrugation sealed prevented the boat from weakening. In other words, the whole boat didn’t have to be covered with tape, just the corrugated parts exposed to water.
Lesson 3, students watched videos of boats on Youtube and looked for points of failure. We noticed many boats did buckle in the middle and broke away from the sides. We tested ways to make the bottom strong including flipping the corrugation different directions and laying them on top of each other made the bottom strong enough to hold! We placed the prototype boat on top of two chairs, spaced apart. Students got into those boats and they didn’t buckle! To be absolutely sure we were on the right track with our prototypes, we built 2 regular sized boats in 2 different ways and I took them home and then to a nearby pond. I placed my own children in the boat and took video of the test, before, during and after.
Lesson 3.5 students analyzed the video and discussed the results. Then students decided how this new information impacted their design idea for their boat on the actual boat making day.
Lesson 4, students created the parts of our boats on 8×11 sheets of paper and tried to cut them out using the least amount of cuts possible. We went through a ton of scrap paper and learned this would be harder than we thought! Maybe we should just get really good with taping our seams.
BOAT MAKING DAY- all 45 students took over the teacher workroom, hallway, Innovation Lab, and another classroom. We had 5 adults armed with box cutting tools and students grouped in new groups. They were sent off with large sheets of cardboard, pencils, sharpies and 2 rolls of tape. When they were ready to cut pieces, an adult with a boxcutter came to assist. In 2.5 hours, 15 boats were constructed and stacked ready to be transported to the pool at our Upper School.
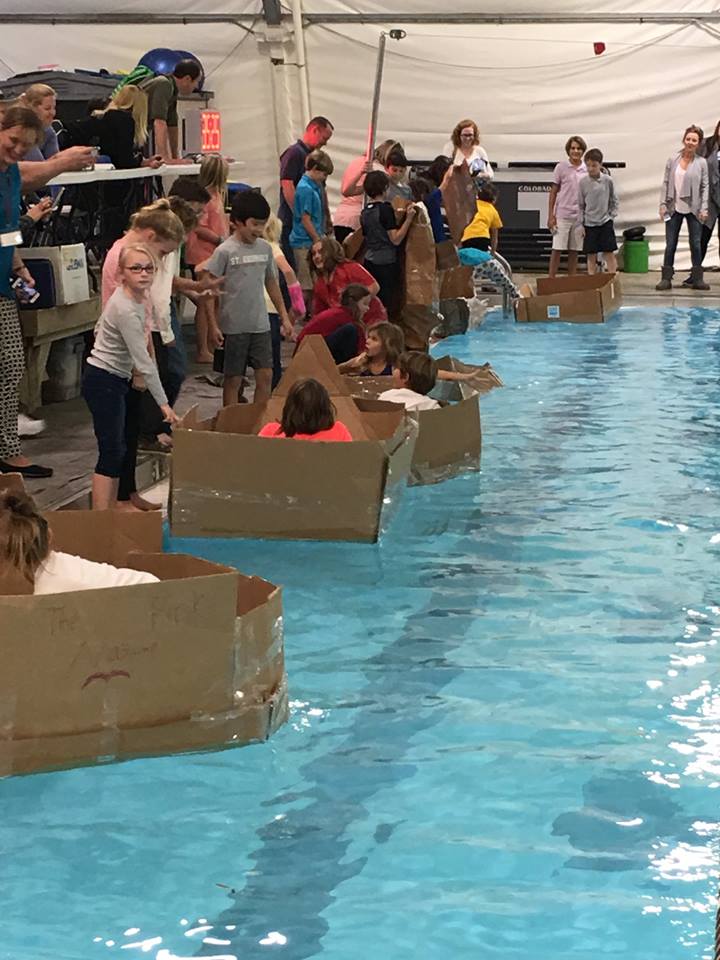
FLOATING DAY-the big event happened a few days later. Families came to watch the big event! Students placed their boats into the pool themselves and all began boarding their boats simultaneously. To our delight, the boats were floating!