Making an Automatic Night Light
Idea Exploration
After an extensive search process, I narrowed down my options to two main ideas: creating an automatic night lamp or a lamp with voice control. It took me over 4 hours to find a suitable project idea that aligned with my skill level and the tools I had available. Ultimately, I decided to proceed with the automatic night lamp since I had all the necessary components to complete the project.
Sensor Used
I chose to use Light Dependent Resistors (LDRs) or photoresistors in my design as they are capable of detecting the presence or absence of light.
Design Process

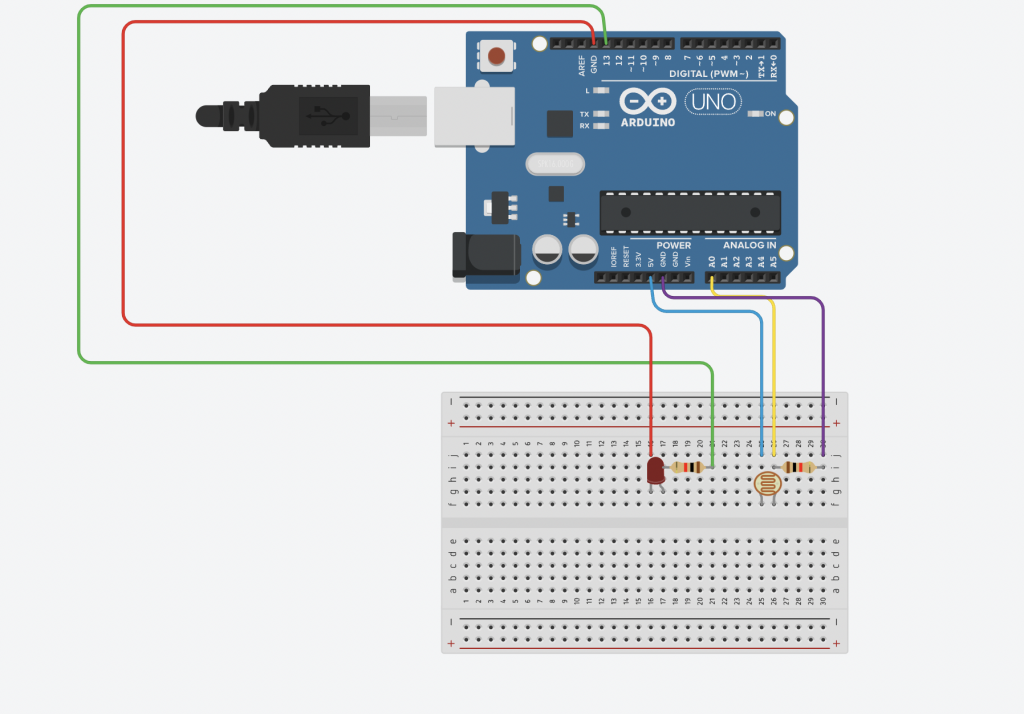
Wiring Circuit Designed using TinkerCAD 
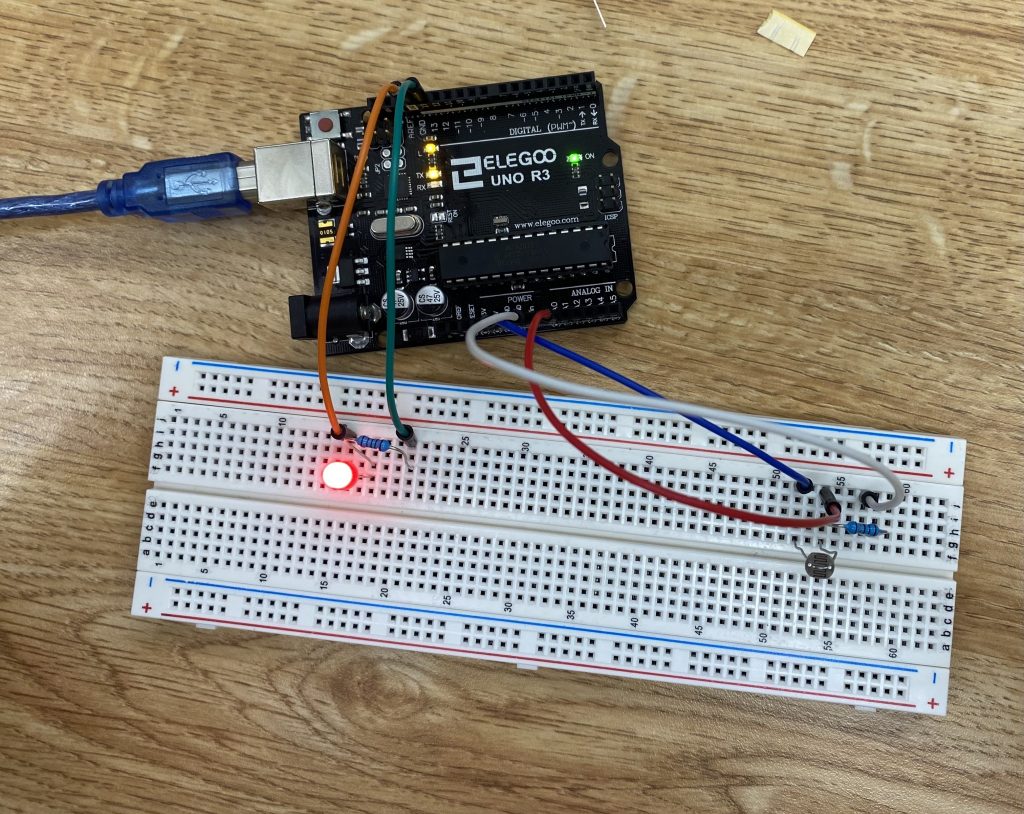
Actual Wiring Circuit
created the circuit as depicted in the wiring diagram and connected it to my laptop.
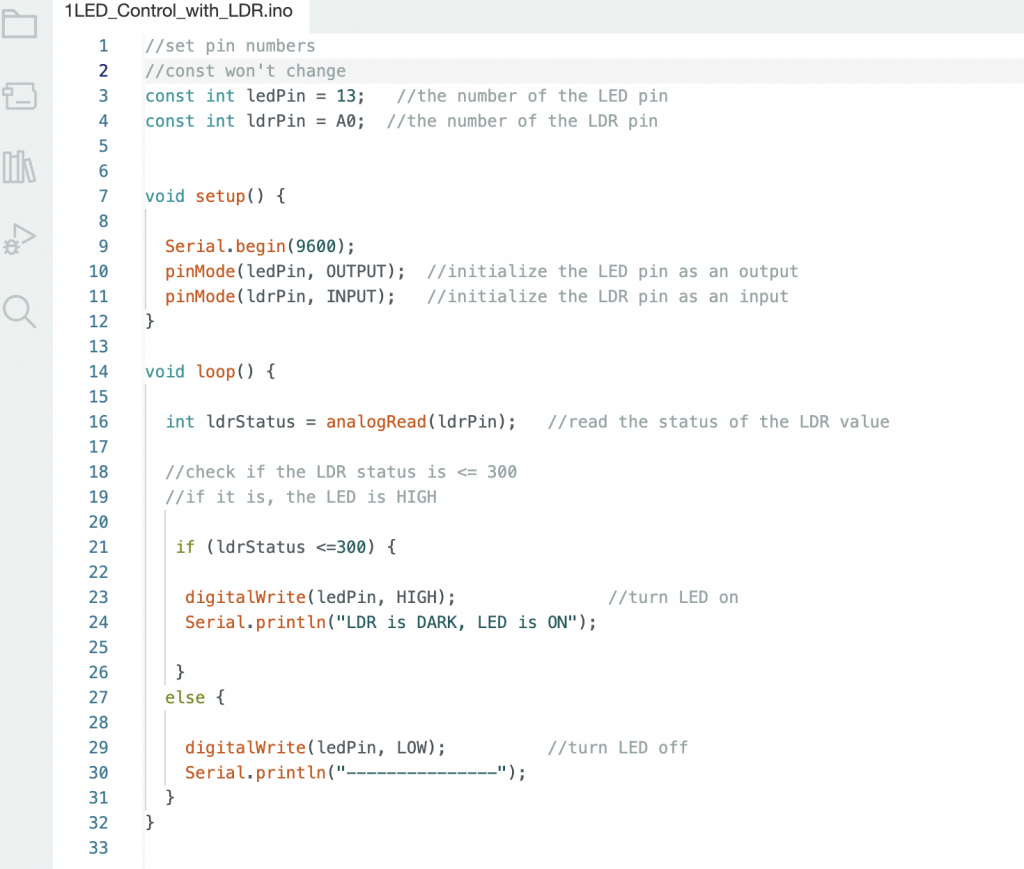
Code used

The LDR senses the amount of light falling on it and provides an analog voltage output proportional to the light level.
The code starts by setting the pin numbers for the LED and LDR as constants, which means that they will not change throughout the program. The LED pin is set as an output, and the LDR pin is set as an input.
The loop function then reads the analog value from the LDR using the analogRead function, which returns a value between 0 and 1023 corresponding to the voltage level at the pin. The code then checks if the LDR status is less than or equal to 300, which means it is dark.
If the LDR is dark, the code turns the LED on by setting the LED pin high using the digitalWrite() function and prints a message to the serial monitor using the Serial.println() function. If the LDR is not dark, the LED is turned off by setting the LED pin low, and another message is printed to the serial monitor. The loop() function then repeats continuously.
Running the Code
Although the light turned on, it did not change in intensity in response to changes in the surrounding light. This indicated an error in the circuit, as the light should have adjusted its brightness in accordance with the level of light.
Troubleshooting
To determine the threshold LDR value for the LED to turn on, the value of 300 was likely selected after experimenting and testing in the specific lighting conditions of the circuit. To test if the LDR was causing issues, I replaced it with different values (randomly chosen from 0 to 1000) but did not observe any differences. I then removed the LDR to check if it was causing the problem. However, the LED remained on even without the LDR, indicating a problem with the code rather than the LDR. I was unsure of what to do at this point, as it was unclear whether the LDR was faulty or if there was a problem with the code. To troubleshoot, I borrowed an LDR from a classmate’s kit and tested it, which successfully affected the LED. This confirmed that the issue was with my original LDR and not the code.
Changes made to orginal: I ended up still changing the LDR values used in the code as I found a value of 500 gave better results with the light intensity.
Final Product
Reflections
Difficulties: As a first-time user of an Arduino kit, the process was challenging. One of the biggest obstacles I faced was not having all the required components and using a different type of Arduino board than the ones used in the videos I watched. Additionally, I struggled with the entire Arduino process and did not achieve the desired outcome. My main concern was finding a project that I could complete with the materials provided in my Arduino kit. After extensive searching, I finally came across a video that explained a similar project, and I had all the necessary components to complete it.
Learning Point: The process taught me the significance of every component in a circuit. A single misplaced wire can render the entire design ineffective. I also realized the value of troubleshooting to ensure each element is accurately placed and functioning correctly.
Uses of Arduino in Daily Life: The potential uses of Arduino in daily life are endless. As seen in my design, Arduino can be utilized to create an effective automatic night lamp that operates in the dark. Additionally, Arduino can be employed for home automation, including controlling lights, fans, air conditioners, and other household appliances.
Sources
https://www.tinkercad.com/things/f4fJJcUMhGk-copy-of-arduino-uno-r3/editel?tenant=circuits: TinkerCAD link used to design circuit diagram