
Turn Milk Into Plastic
Introduction & Motivation
How can milk be changed into plastic? To answer that we need to think first about what plastic is.
The word plastic is used to describe a material that can be molded into many shapes. Plastics do not all look or feel the same! Think of a plastic grocery bag, a plastic doll or action figure, a plastic lunch box, and a disposable plastic water bottle. They are all made of plastic, but they look and feel different. Why? Their similarities and differences come from the molecules that they, like everything else, are made of. Molecules are the smallest units (way too small to see with your eye!) of any given thing. Plastics are similar to each other because they are all made up of molecules that are repeated over and over again in a chain. A word we recently learned for this type of materials is polymer.
Sometimes polymers are chains of just one type of molecule, but other times polymers are chains of different types of molecules that link together in a regular pattern. A single repeat of the pattern of molecules in a polymer (even if the polymer uses only one type of molecule) is called a monomer.
Milk contains many molecules of a protein called casein. When you heat milk and add an acid, the casein molecules unfold and reorganize into a long chain. Each casein molecule is a monomer which will hooked together with many more of itself in a repeating pattern. The polymer this forms can be scooped up and molded, which is why it is a plastic!
In this activity, students will investigate what is the best recipe for making casein plastic by making batches of heated milk with different amounts of lemon juice. How much lemon juice is needed to give you the most plastic? Without enough lemon juice the casein molecules do not unfold well, making it difficult for them to link together into a polymer. However, when trying to manufacture this plastic, both the amount of plastic you can make and the cost are important. The more of any ingredient you use, the less of a profit you turn! (Remember: Profit = money made – money spent to make it!) The “best” recipe will have the highest yield (make the most plastic) for the smallest amount of lemon juice.
The plastic you make will be a bit more crumbly and fragile than typical plastic. That is because the companies that made those casein plastics included a second step. They washed the plastic in a harsh chemical called formaldehyde, which helps to harden the plastic. Although we will not use formaldehyde because it is too dangerous to work with at home, the unwashed casein plastic made in this activity is still able to be molded.
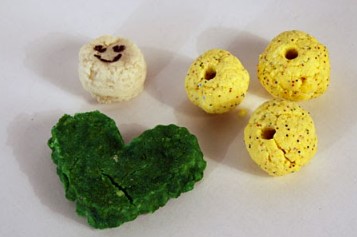
Once you have a recipe, with the best ratio of lemon juice to milk, for your casein plastic, you can have fun with it. Try shaping it, molding it, or dyeing it to make beads, figures, or ornaments, such as those shown above!
Materials
- 16 oz Styrofoam cups
- Rubber bands
- Pen or permanent marker
- Teaspoon measure
- Lemon Juice (at least 8 oz.)
- Milk (4 gallons/10 pairs of students); nonfat, 1%, 2%, and whole milk will all work
- Hot plate
- Large pot
- Cooking or candy thermometer
- Spoons
- Cotton cloth or pieces of old T-shirts
- Paper towels
- Lab notebook
- Optional (for fun): molds, cookie cutters, food coloring, paint, glitter, permanent markers
Procedure
This experiment uses hot liquids, so an adult’s help will be needed throughout.
- Heat the milk in a large pot over a hot plate. Make sure the milk is at least at 49 degrees Celsius.
- Give the students a range of 1 to 15 tsp of lemon juice and ask them to find the best amount of lemon juice to add to make the plastic.
- Give each group 1 cup (8 oz) of hot milk in a styrofoam cup.
- Lay a cotton cloth over a second styrofoam cup and secure it with a rubber band.
- Add the lemon juice to the first cup with the milk, stir the mixture with a plastic spoon for 10 seconds.
- Pour the milk/lemon juice mixture over the cotton cloth to collect the plastic.

- Remove the cotton cloth and squeeze out the excess liquid.
- Remove the plastic from the cotton cloth, it is ready to mold! Add food coloring or glitter, and shape it with by hand or with cookie cutters.

- Weigh the casein plastic and record it along with the amount of lemon juice to 1 cup of hot milk. Repeat steps 3 – 7 until the group has found the desired recipe!
- Gather the class’s data together on a graph and determine as a whole what the best amount of lemon juice is if the goal is to maximize the amount of plastic created.
**Tip! Be sure to have students use the milk immediately, while it is hot. In the excitement of the activity, sometimes the milk will cool enough and the casein proteins with re-coil. This prevents the plastic forming reaction!**
Ideas for Fun With Casein Plastics
Try making beads, ornaments, or figurines out of your casein plastic! You should do the molding and coloring steps (except for paint and/or marker) within the first hour of making the plastic or it will start drying out.
Shaping the Plastic
- Knead the dough well before shaping it.
- Molds and cookie cutters work well on the wet casein plastic.
- You can also sculpt the wet casein plastic into figures, but it takes a bit more patience.
Coloring the Plastic
- Food coloring, glitter, or other decorative bits can be added to the wet casein plastic dough. The beads shown above were made from casein plastic dough that had yellow food coloring and multicolored glitter kneaded into it.
- Dried casein plastic can be painted or colored on with markers. The smiley face in the introduction is on uncolored casein plastic and was drawn on using a black permanent marker.
Hardening the Plastic
- Casein plastic will be hard once it has dried.
- Drying time varies depending on the thickness of the final item (thicker pieces take longer), but most casein plastic requires at least two days to become hard.
Discussion
- What is the best recipe for making lots of plastic from 1 cup of hot milk?
- What might get in the way of having an accurate weight measurement? (It is difficult to get all of the casein plastic out of the sieve, and temporarily retained water would increase the measurement!)