Instron Temperature Chamber
Currently Broken!
Make an Experiment Request for assistance.
Features
- Temperatures as high as 600 Celsius
- Verify glass transition, melting, degradation, etc. temperatures before selecting the test temperature
- Cold temperatures via compatibility with Liquid Nitrogen (-196 Celsius)
- Must wear long pants and closed toe shoes
- Hanging weight test
- Must interface with the Hanging weight clamp and the fiberglass Chamber plug
- Standard stress/strain test
- Must use ASTM Type V dogbones (shortest length possible)
- Do not use strain gage at 200 Celsius and above
- Stress relaxation test
- Bending fixtures TBD
Setup
- Jog the crosshead all the way down
- Make sure all grips, extensions, load cell, etc. are removed from interfering with the temperature chamber as it slides on the rails to the testing area
- Slide the temperature chamber into place, against the set screws at the end of the rails
- Screw in the black load cell extender (cylindrical grate) so that it is secured in the original place of the load cell
- Rest the load cell on its extender
- Slide in the top grip extender from inside the temperature chamber, up through the top slot of the load cell
- Turn the load cell plus grip extender so that the pin slot lines up so that the pin slides in horizontally to secure the two (the pin must not have any overhang)
- Secure the top grip to the bottom of the top grip extender with a pin that has a tolerance to the hole in the top grip
- Pass the bottom grip extender through the temperature chamber to secure to the bottom metal tension grip plate
- Attach the bottom grip to the extender with a pin that does not have overhang
- Secure a short aluminum specimen in the grips, aligning the top grip with the bottom
- When secured and aligned, clamp the load cell to its extender with two vices

Running a Test
- Prepare a program in Bluehill for the crosshead movement
- Install sample, close door, and turn on the temperature chamber
- Select a fan speed (reducing fan speed will increase air temperature gradients within the chamber)
- Set load frame to “Load Control”
- Set the ramp rate if applicable “SPrr”
- Program the setpoint on the handset
- Run the test once the temperature has stabilized and soaked
- To cool from a hot temperature, switch the fan off then on again after setting the temperature down to 20 C
Running a test with Liquid Nitrogen
- Prepare a program in Bluehill for the crosshead movement
- Wear proper PPE (cryogenic gloves, coat, face shield) –see safety protocol attached to MSDS packet in Testing Lab
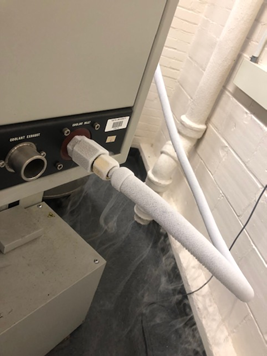
- Connect the liquid Nitrogen tank to the “Coolant Inlet” port (not coolant exhaust) and the Liquid valve on the tank via the male-male ½” hose and tighten with a wrench
- Make sure the pressure of the tank is not above 20 psi. If so, open the vent valve until it is below 20 psi
- Install sample, close door, and turn on temperature chamber
- Set the fan speed at the maximum
- Set the desired temperature, open the liquid valve on the liquid N2 tank, and set “Enable,” “Fan,” and “Cool” as high (indicator lights on)
- Allow for a 10-minute soak time at the desired temperature
- When done with test, set the temperature at 25 C, turn the fan off and then on again
- Close the Liquid port on the tank
- Unscrew the hose from the temperature chamber, aiming it away from you when setting it down
- Keep the temperature chamber running with the door closed until frost is no longer on the Coolant Inlet port