Author: Jonathan Rooney

Shop Training Update: Final Picture Frame Design

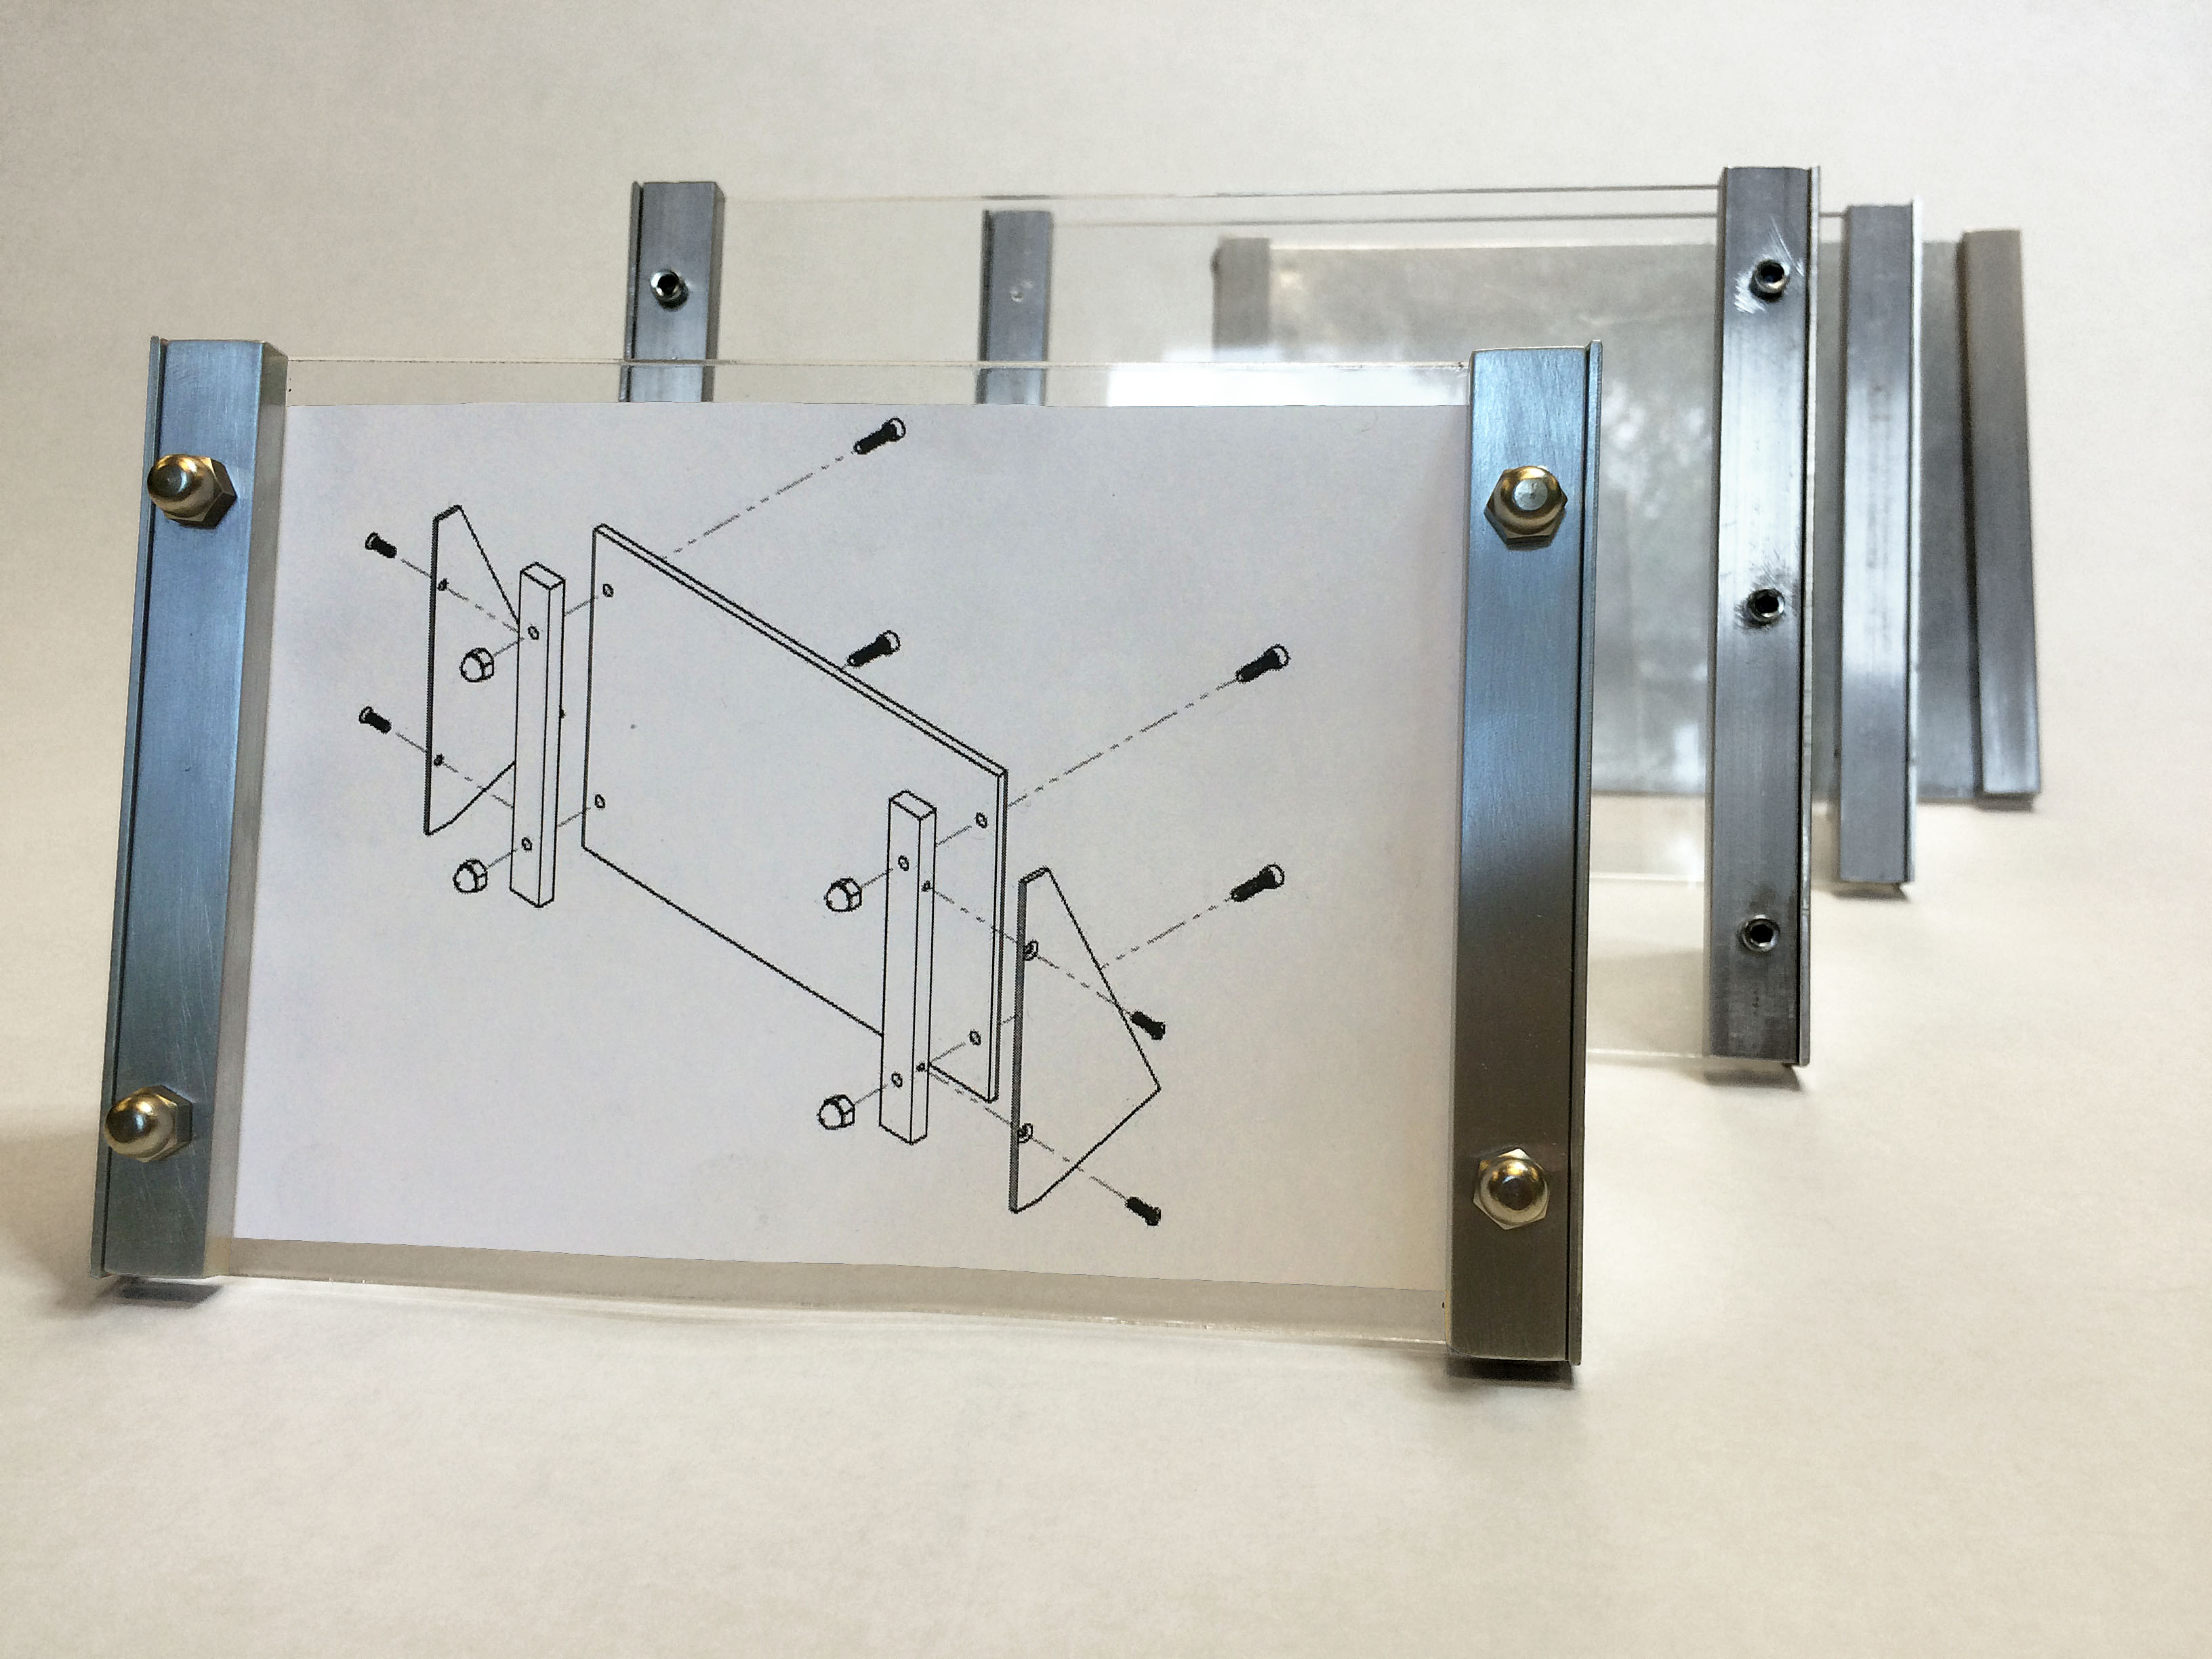
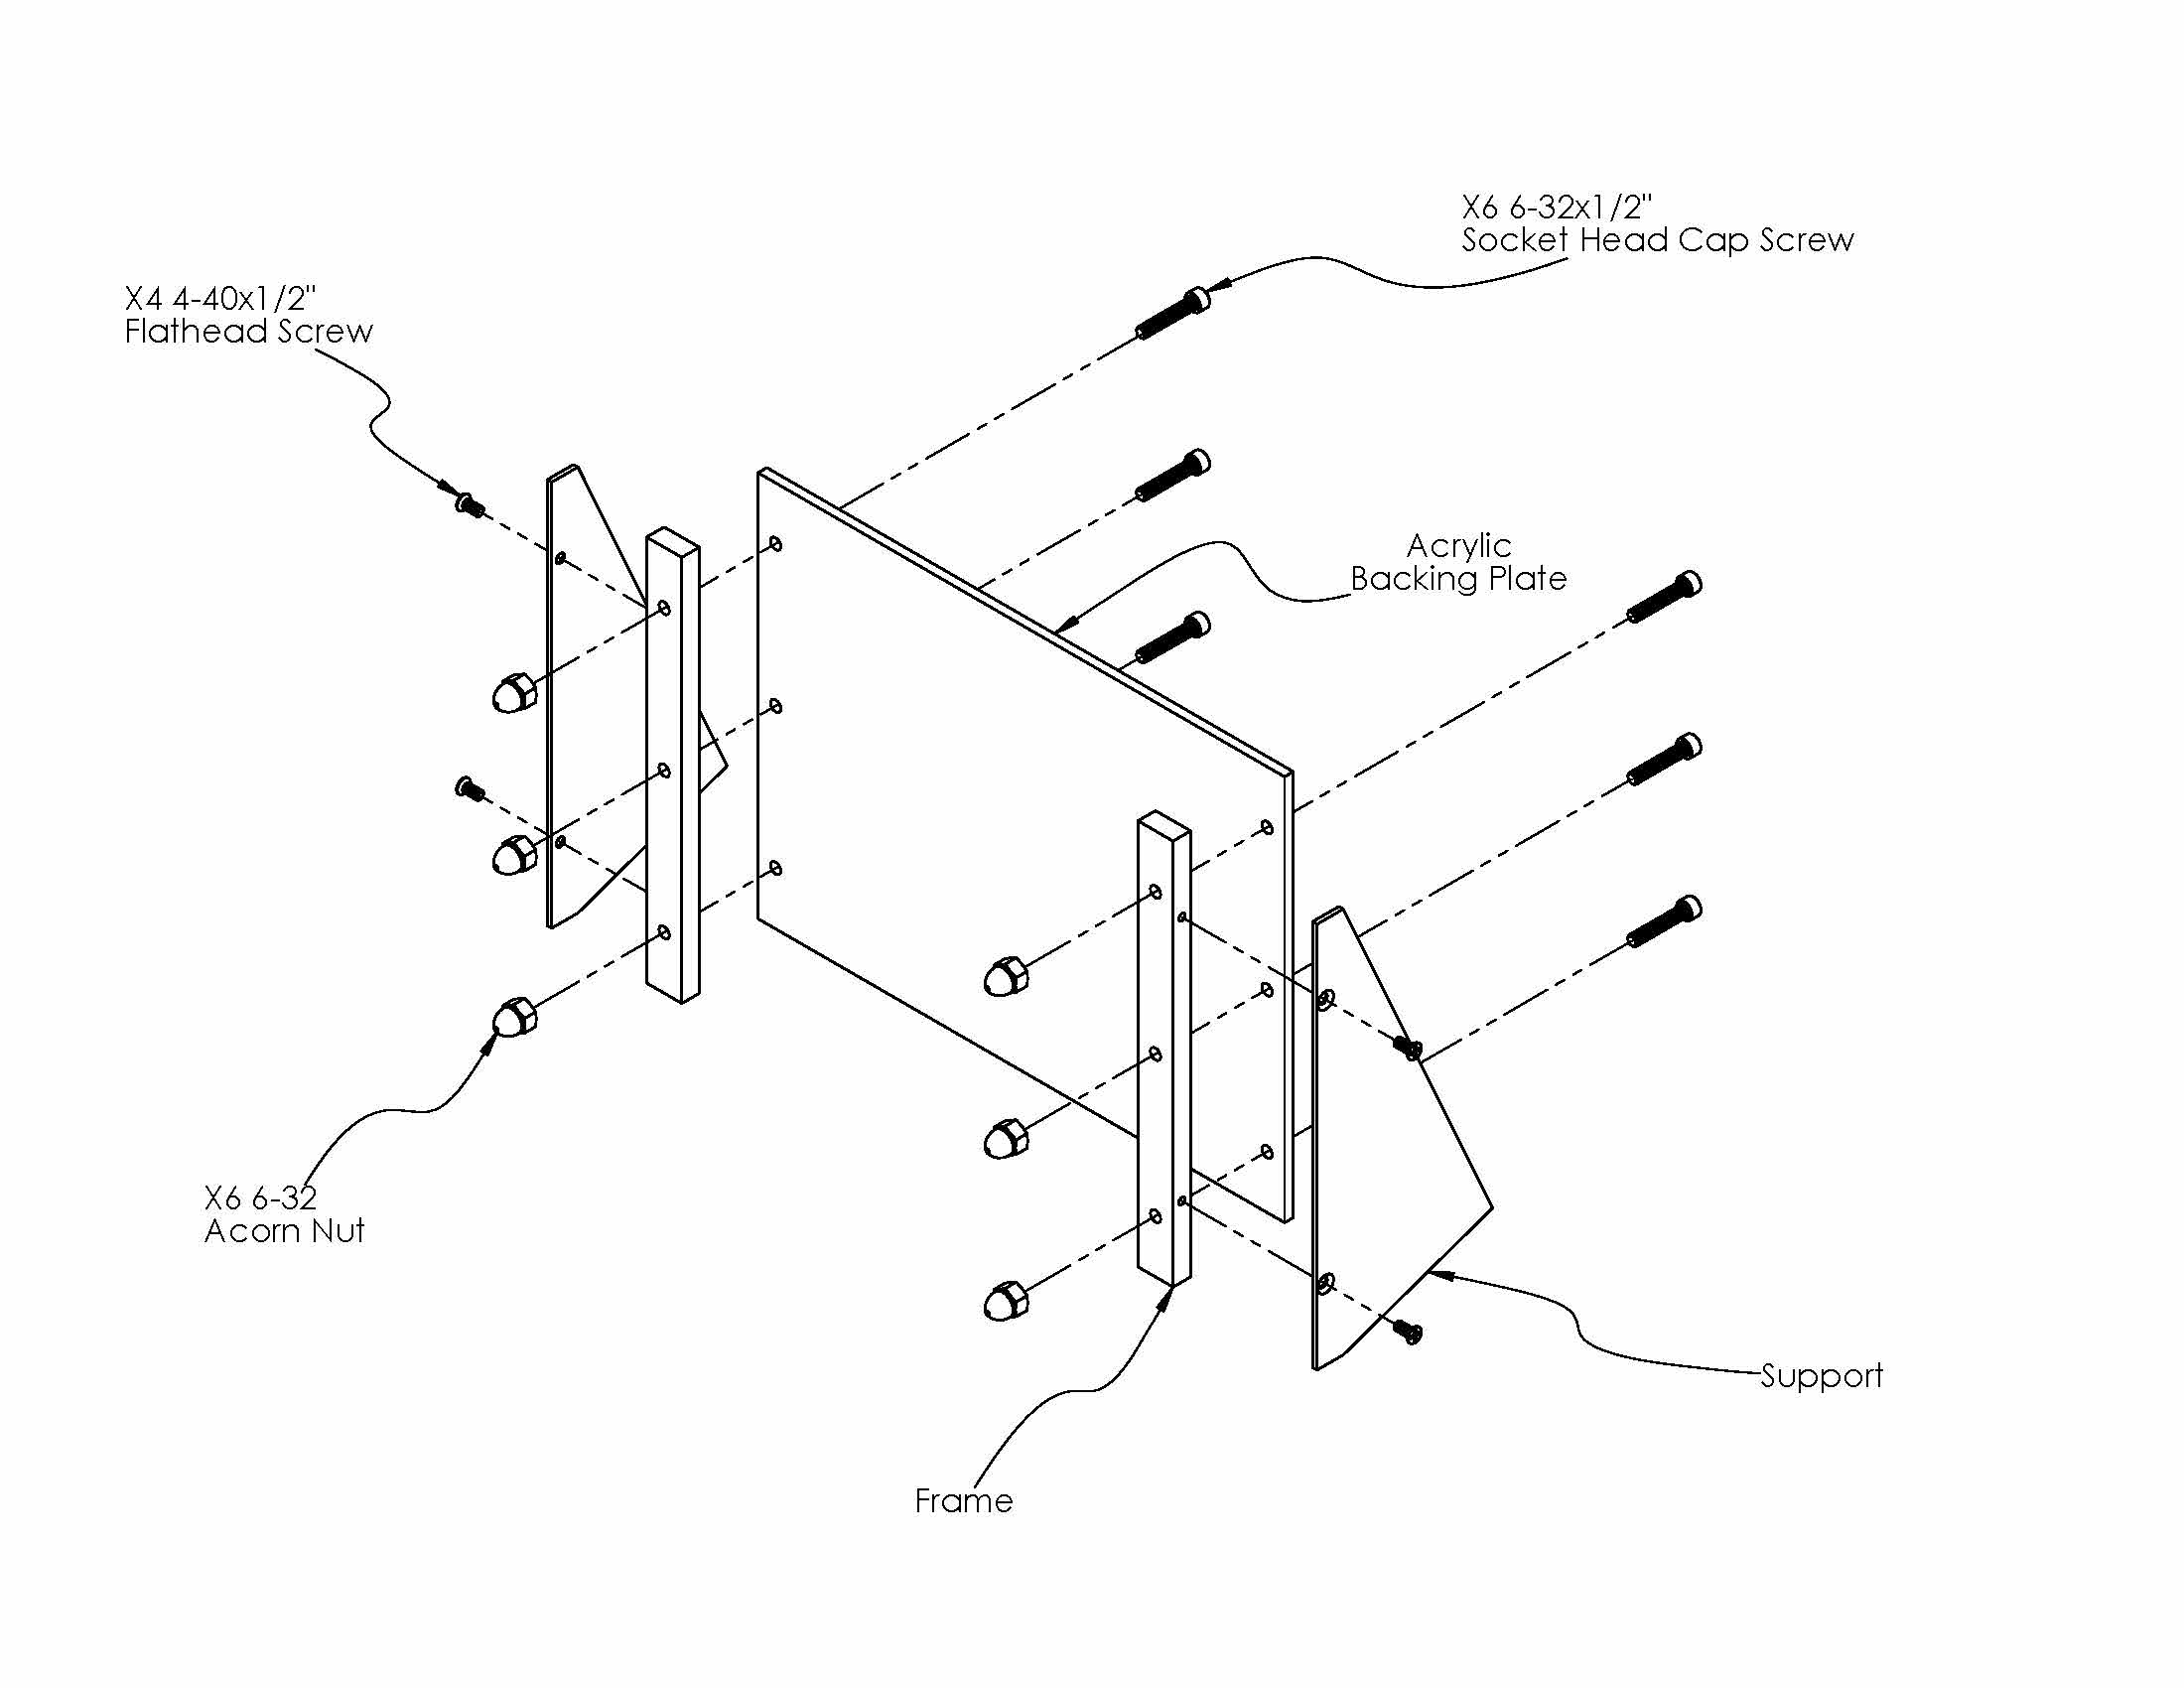
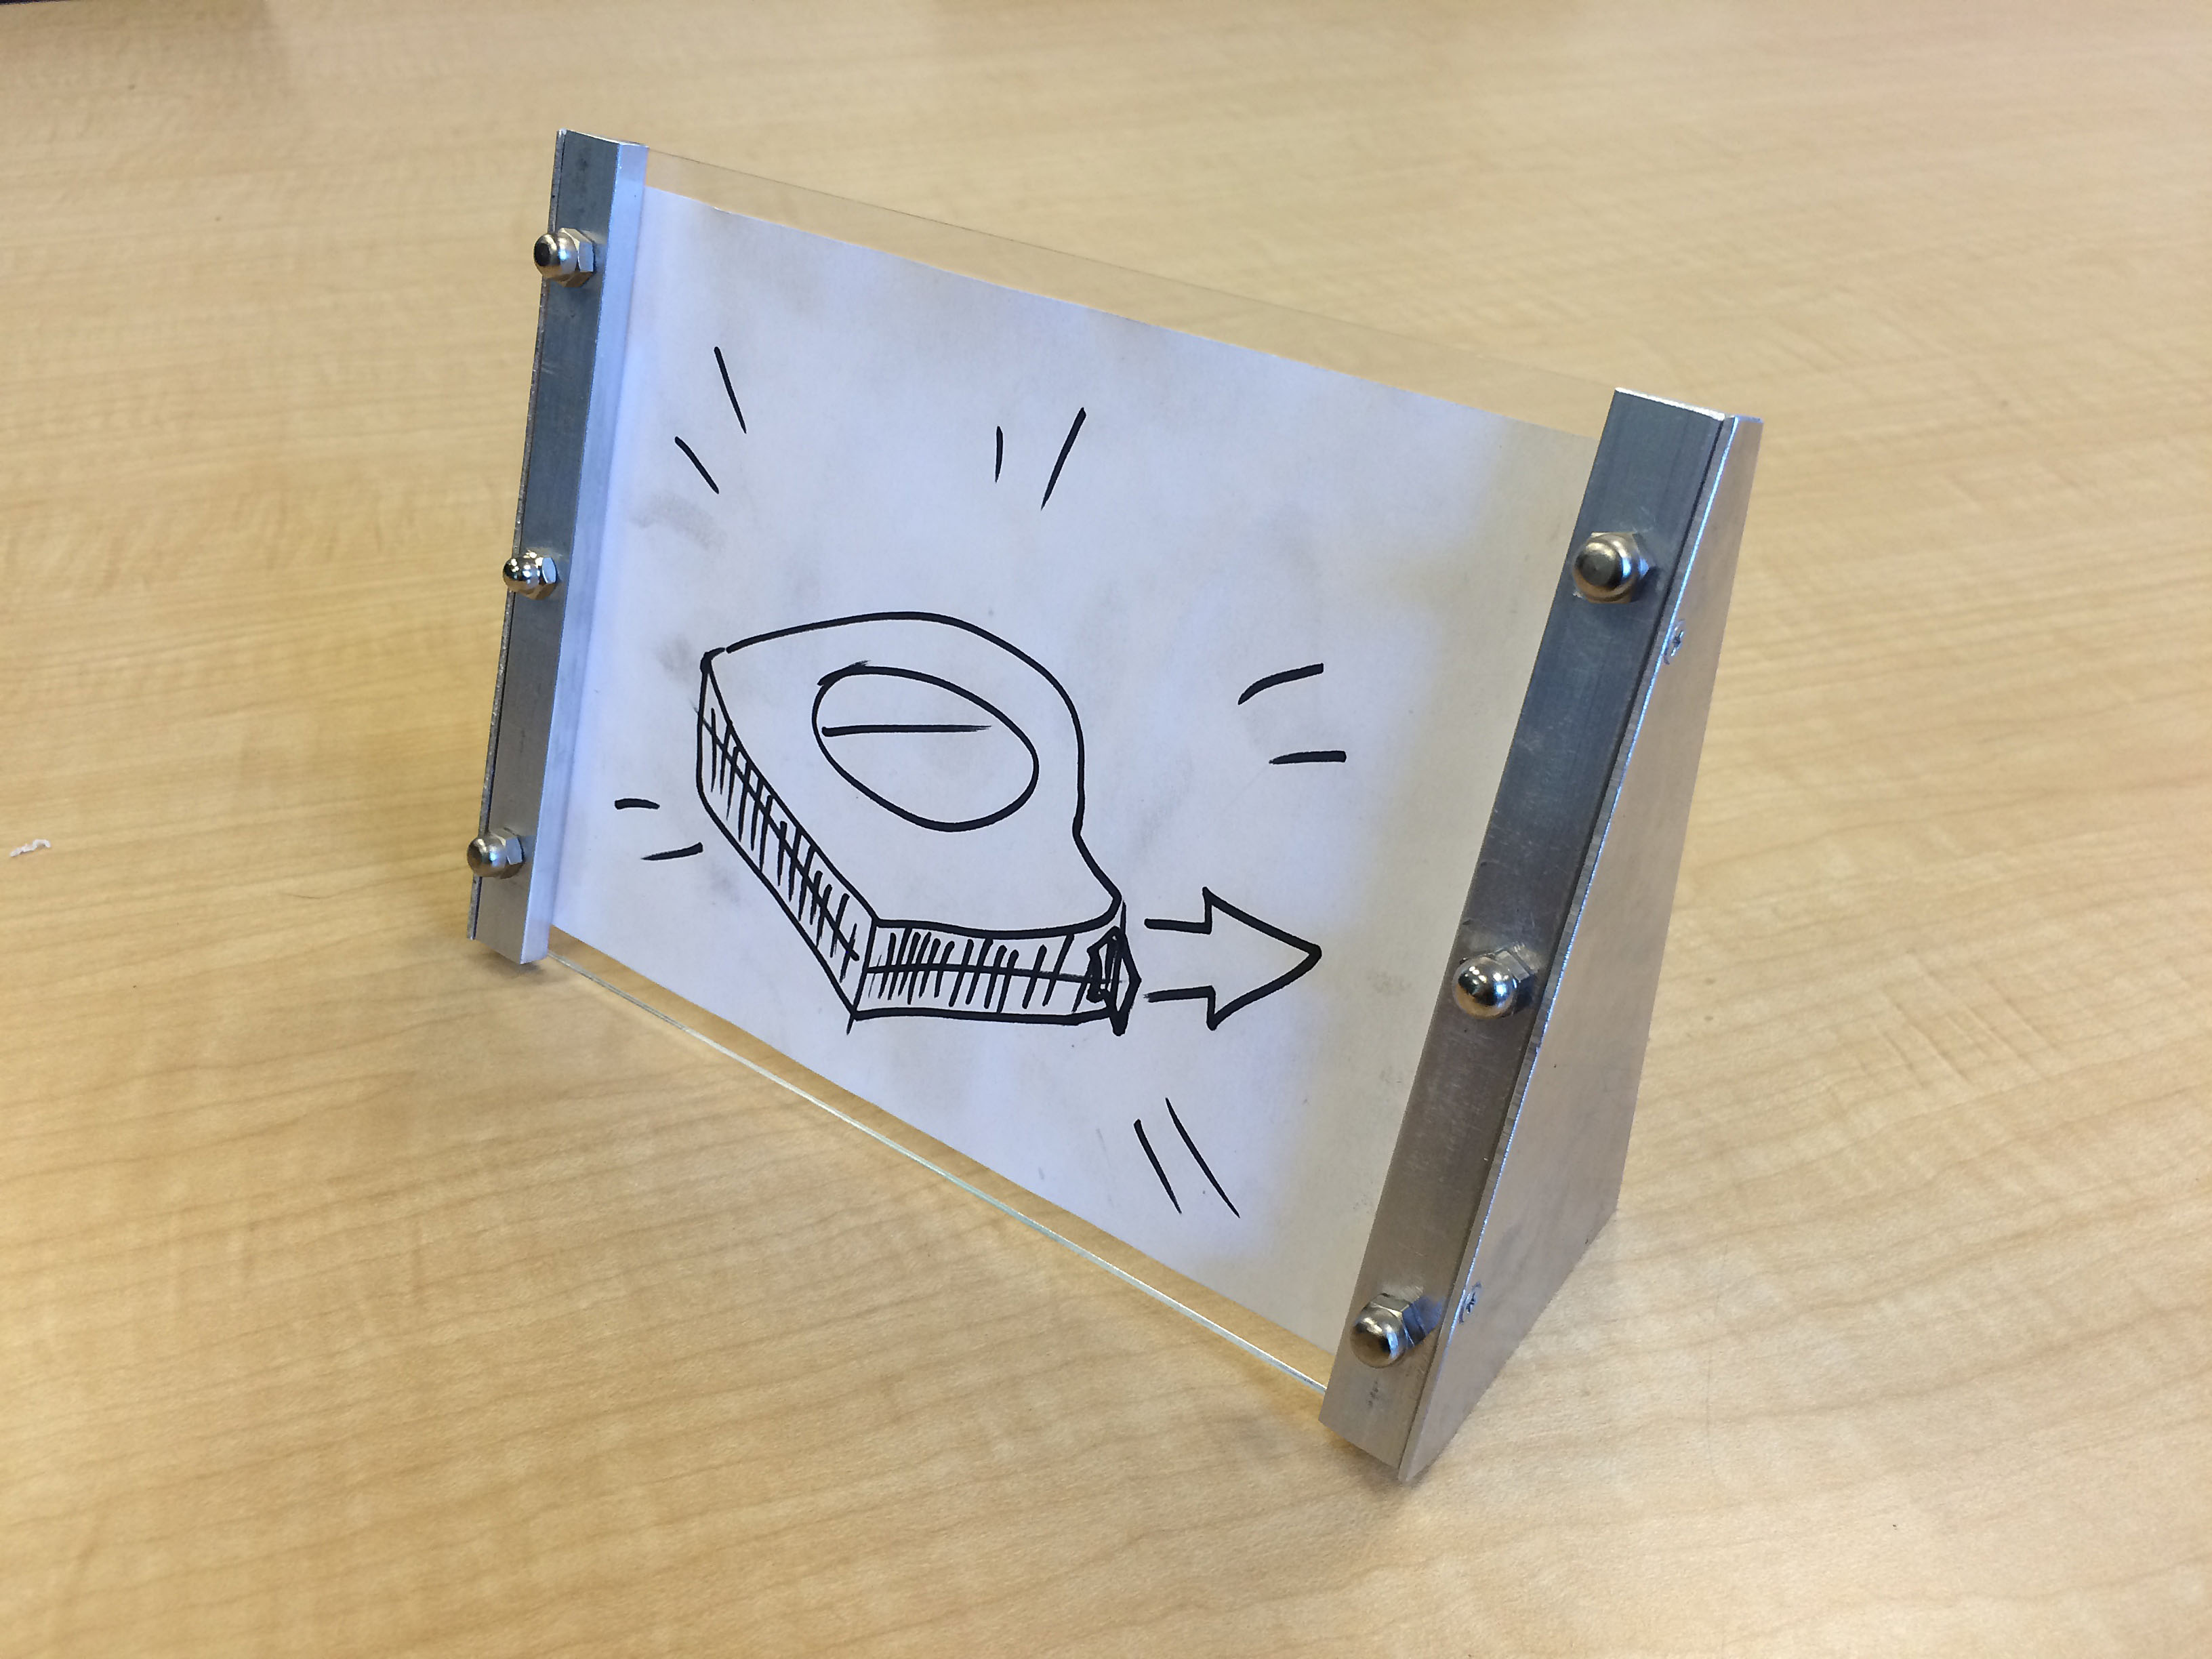
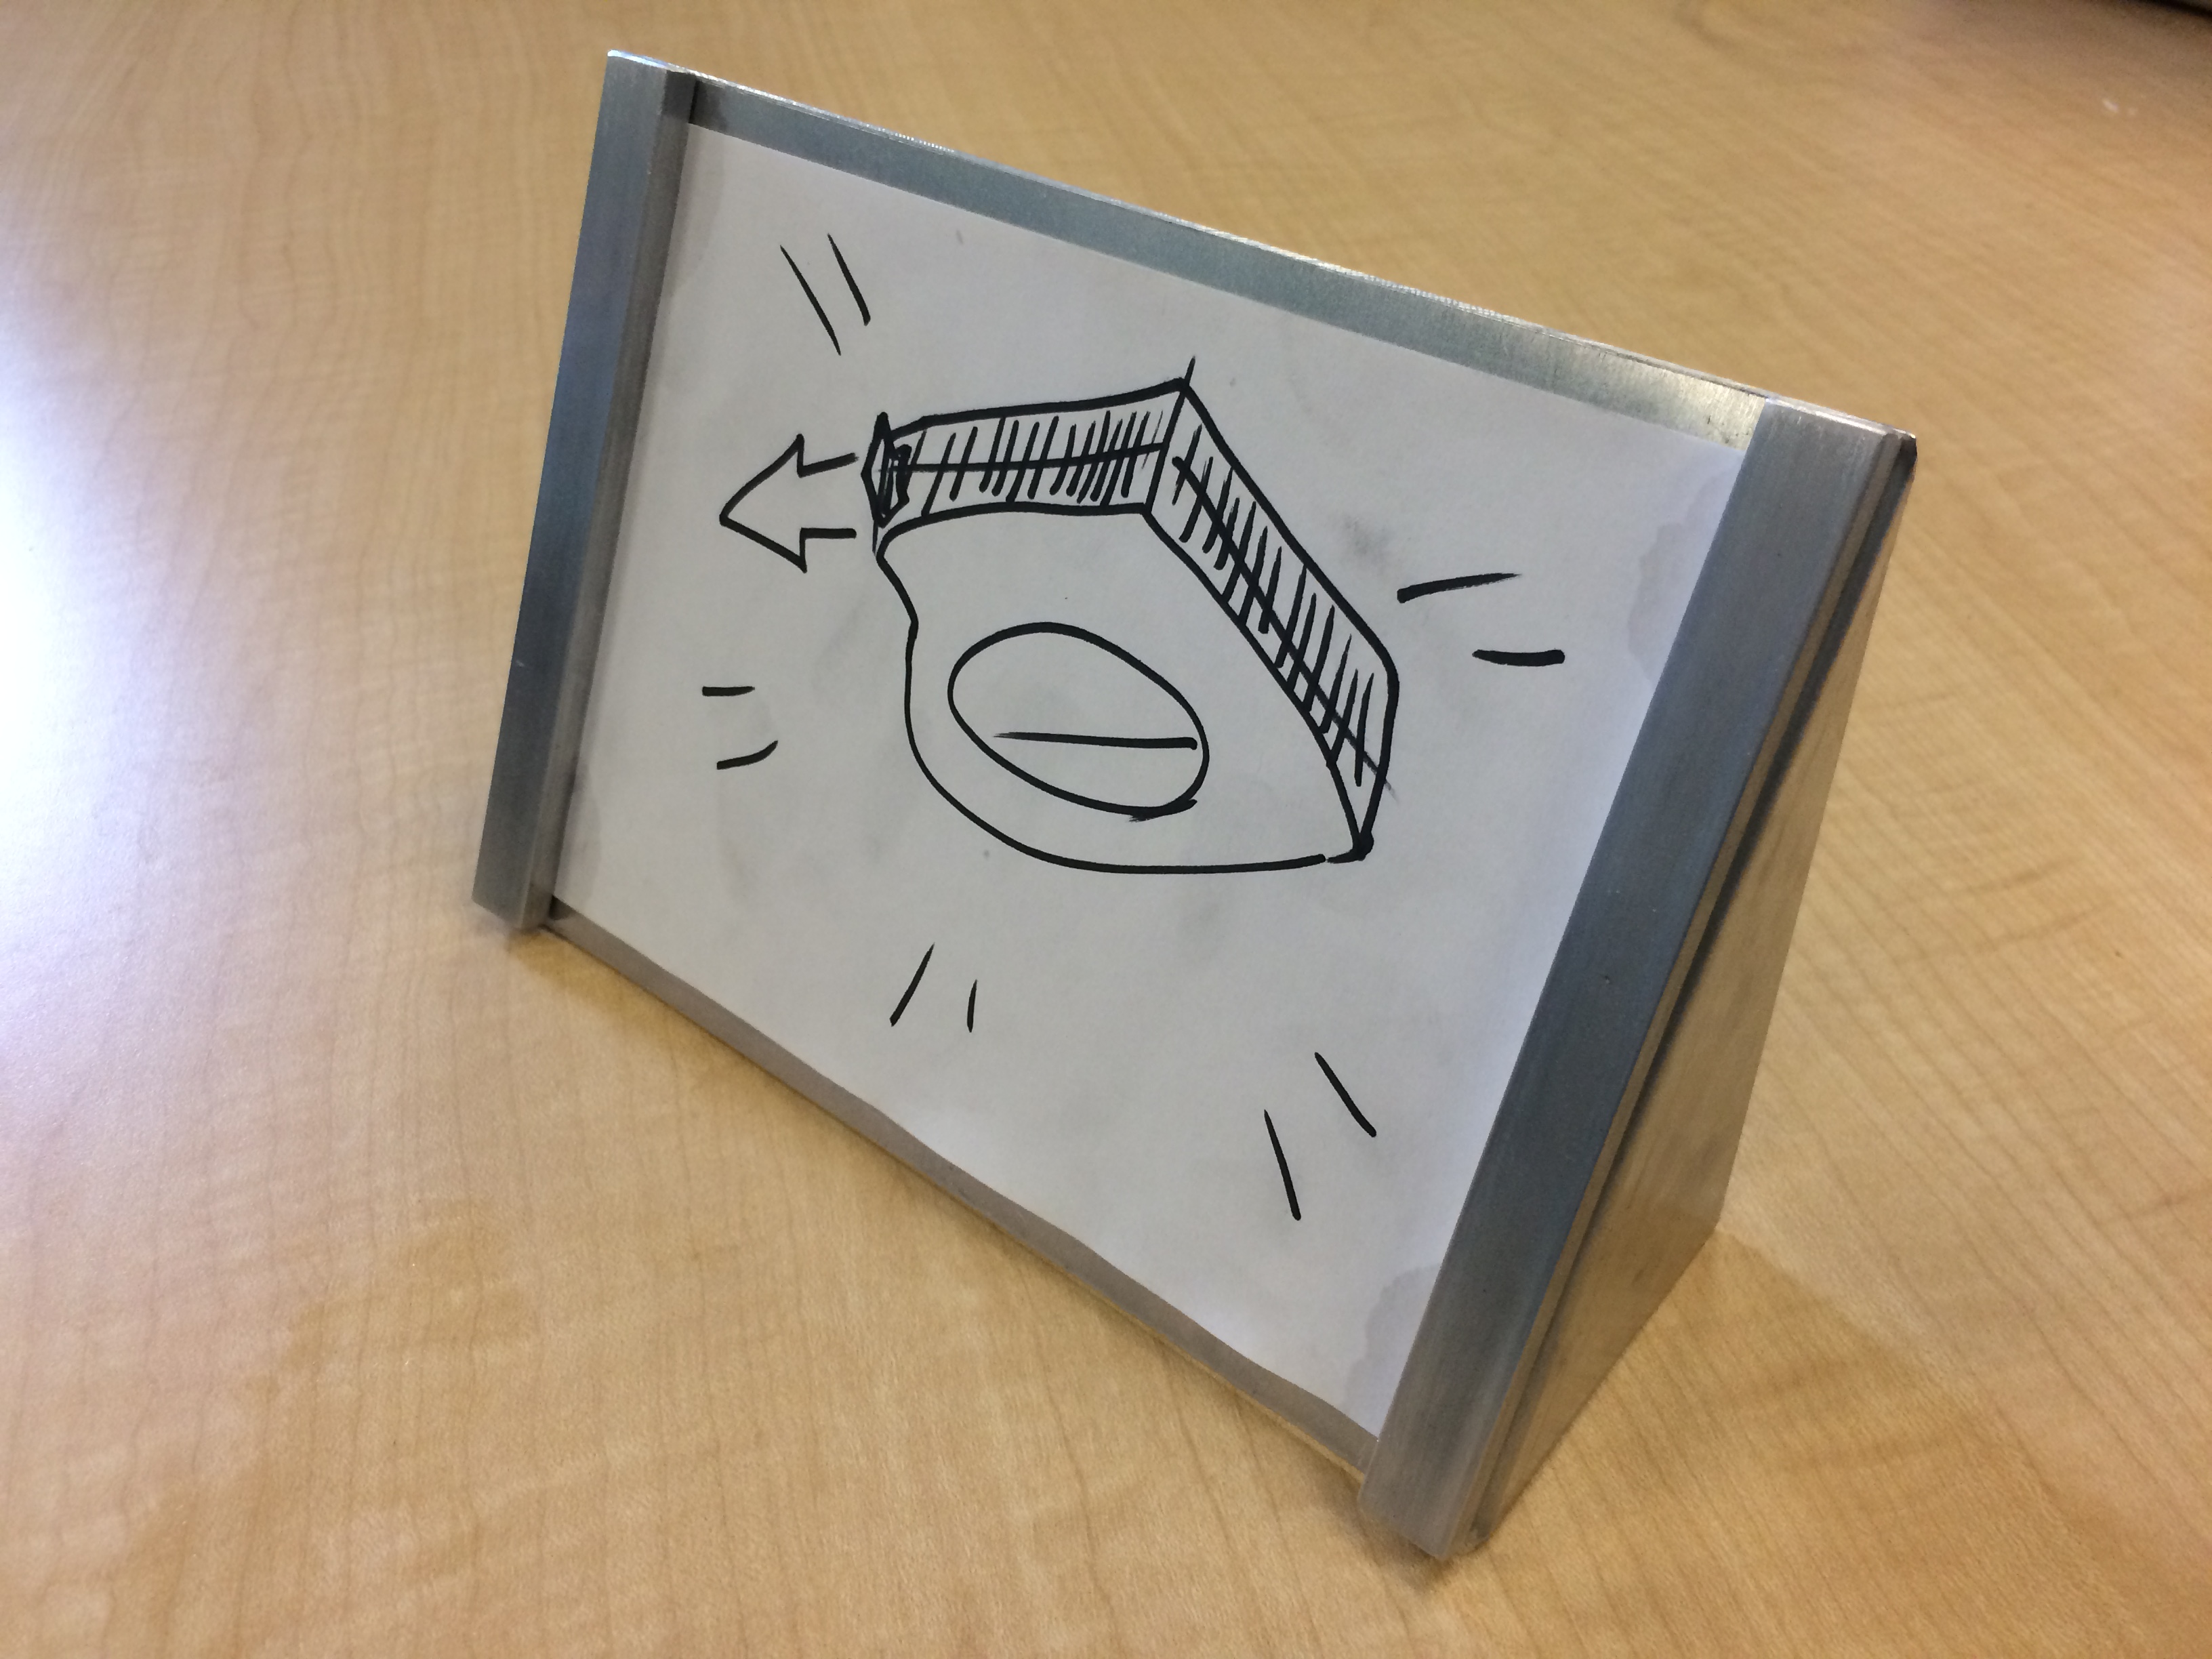
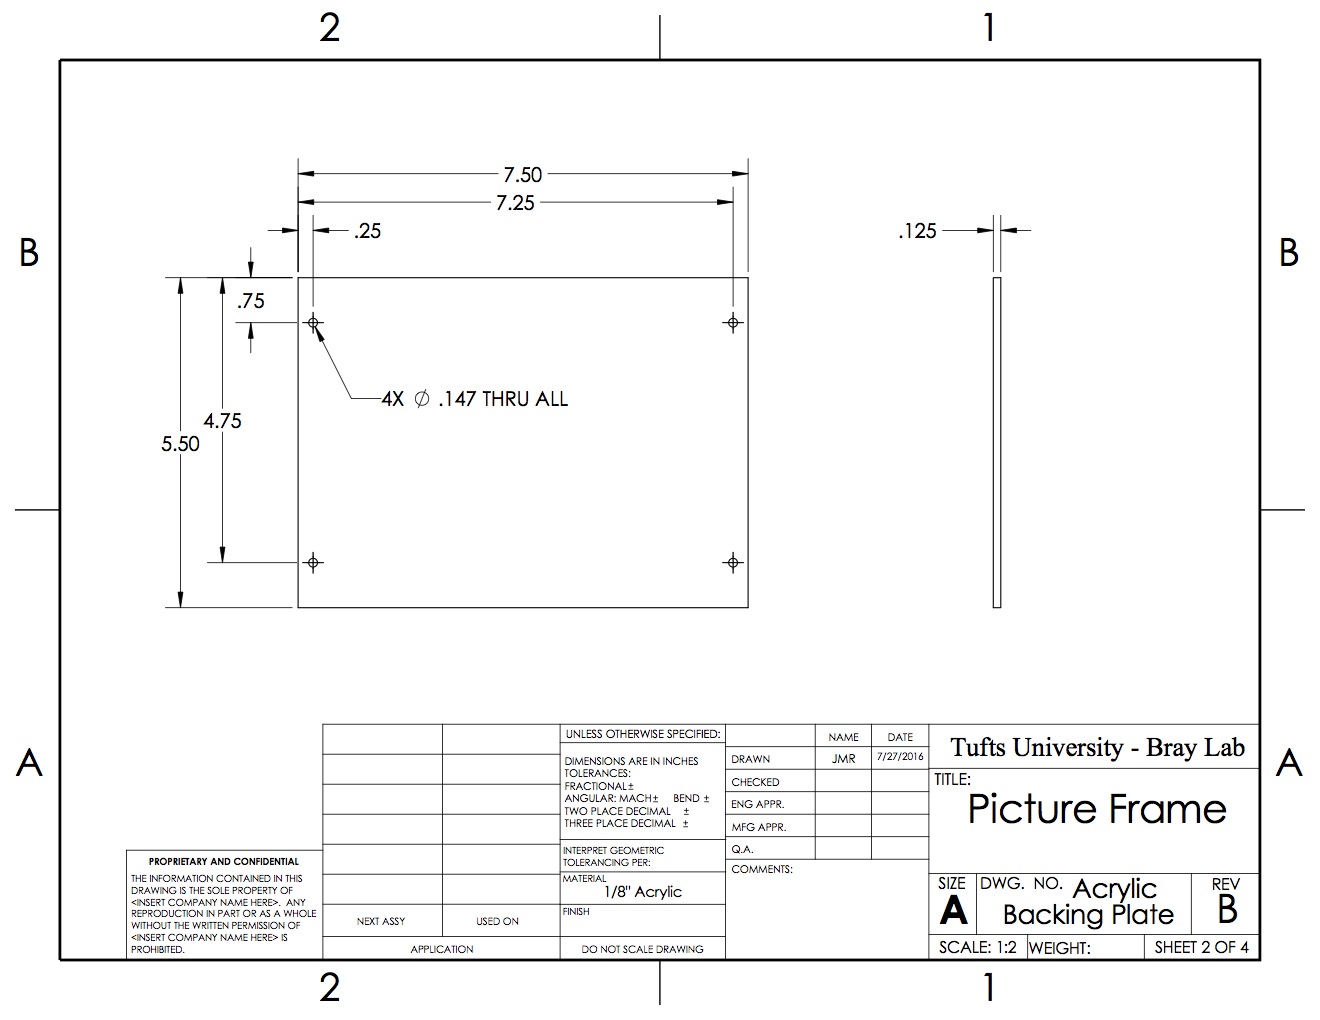
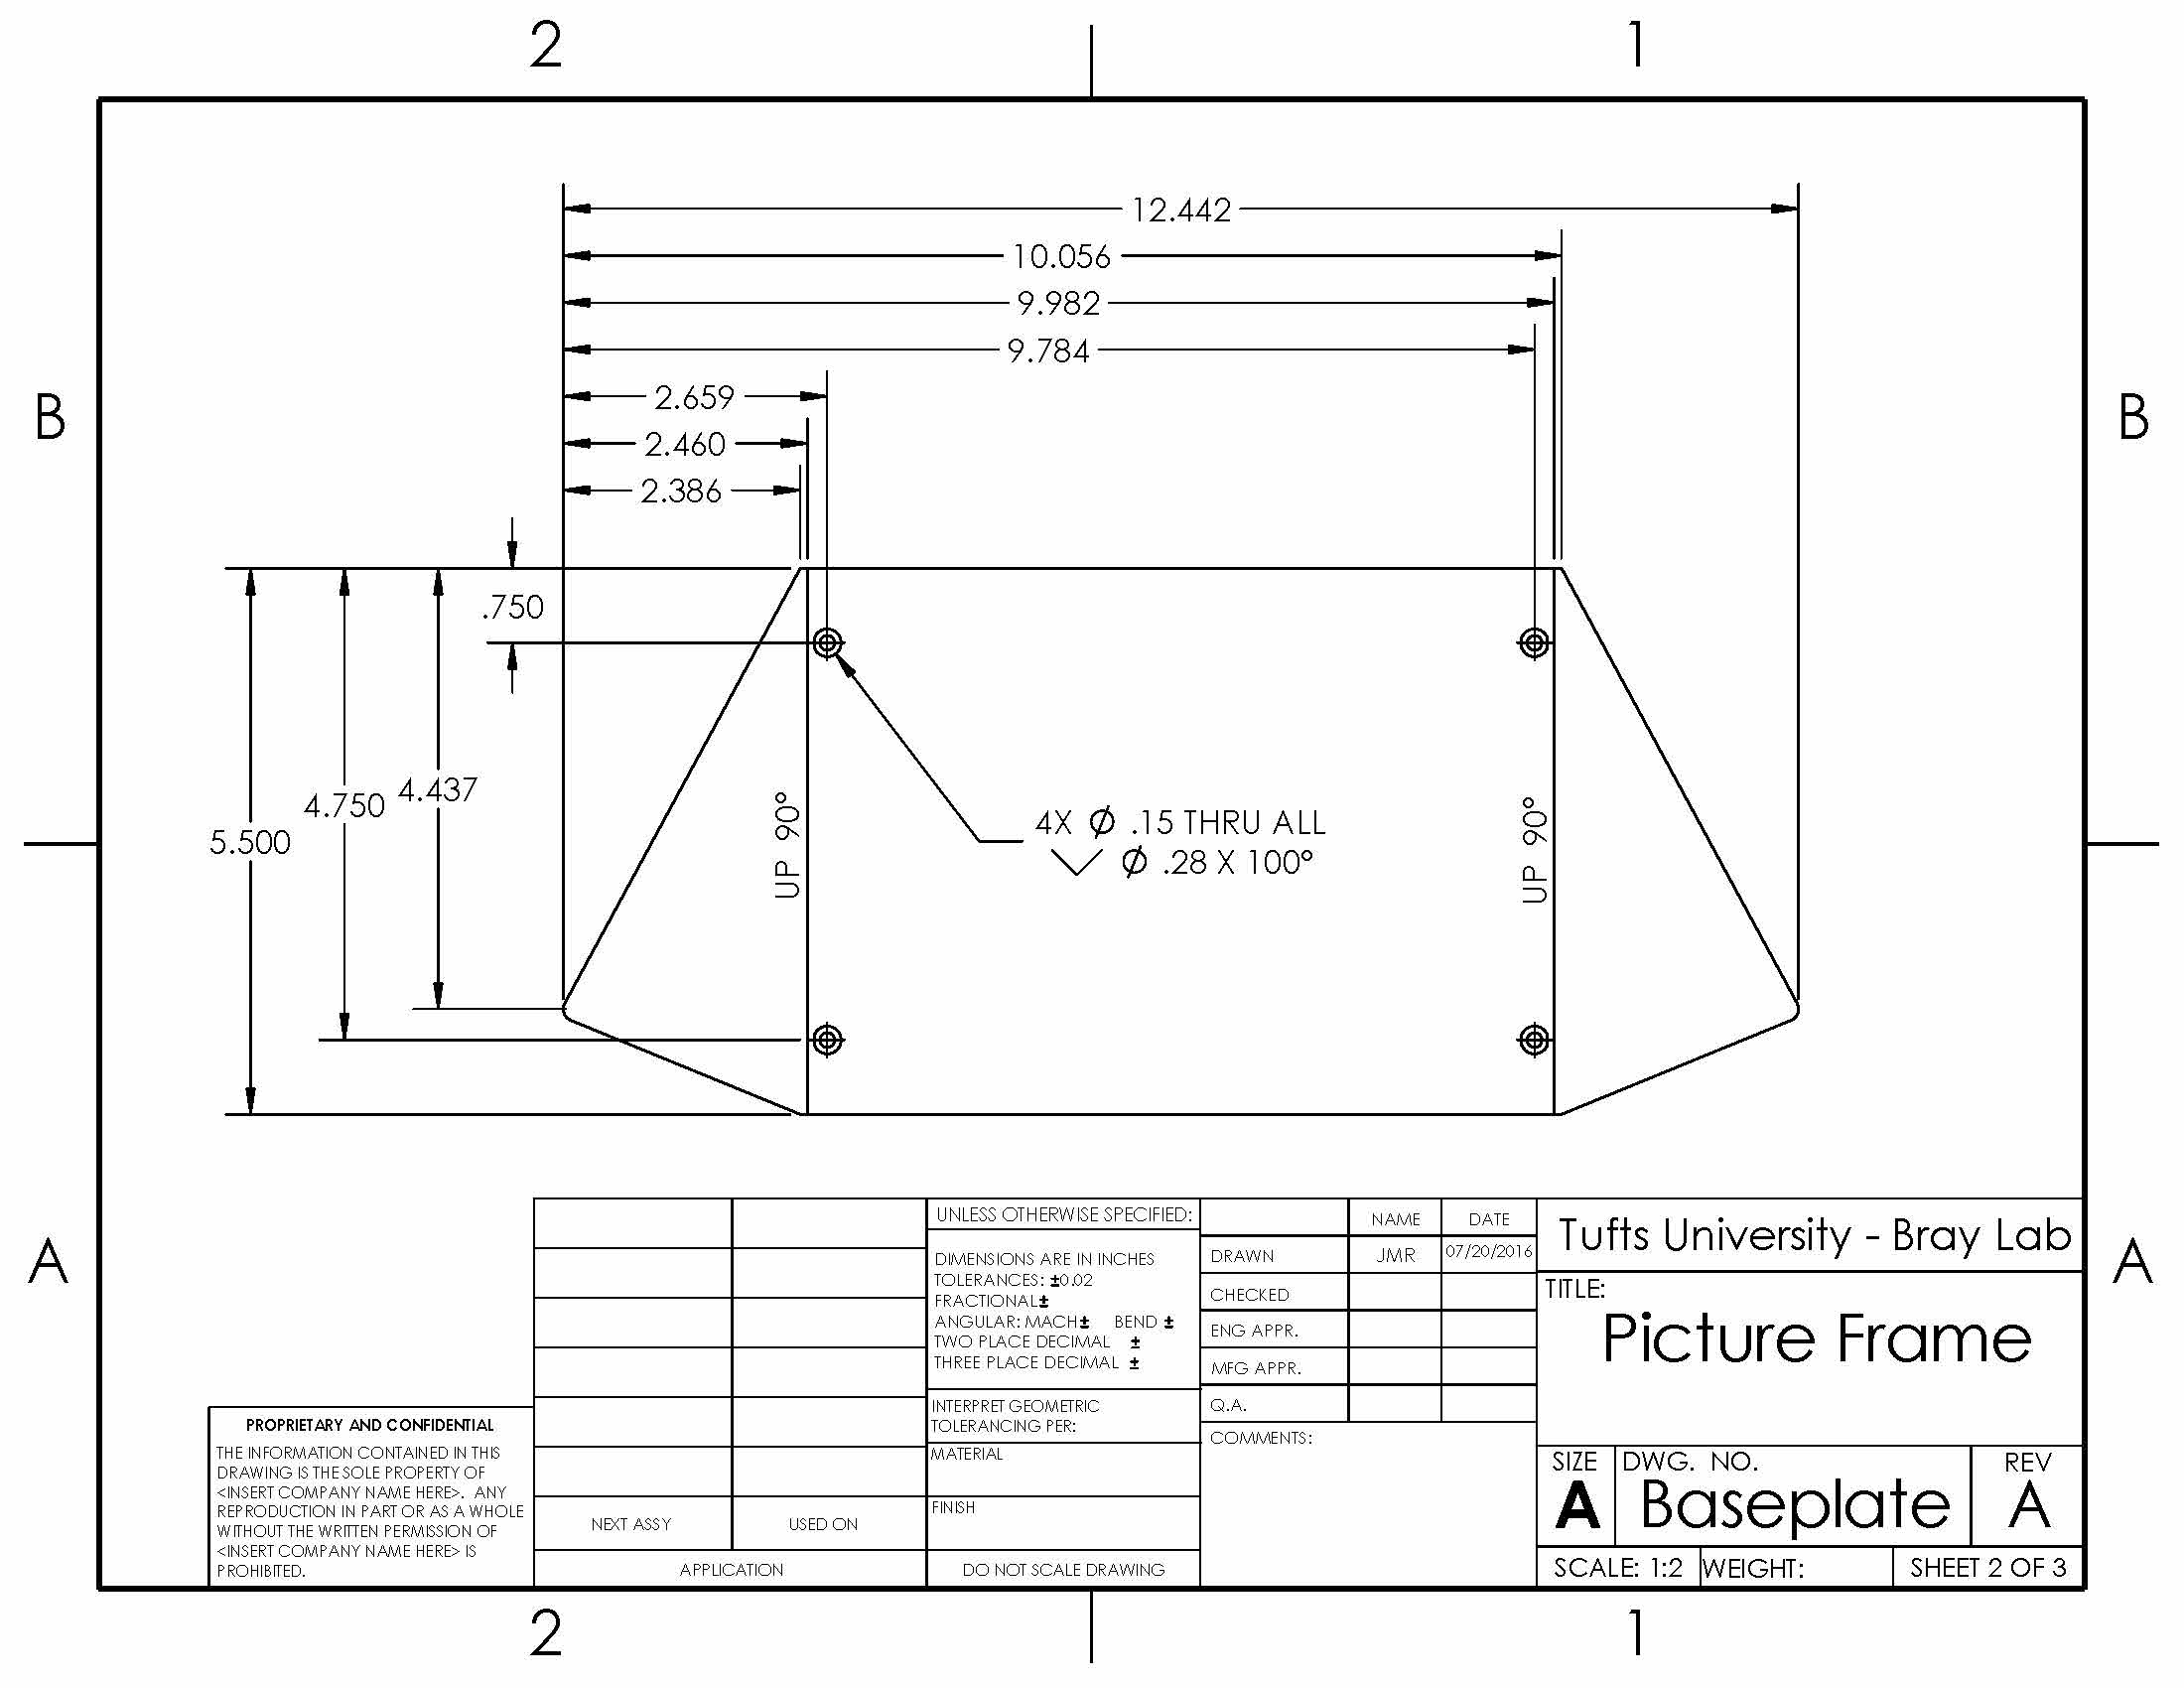
After a long summer of brainstorming, ideating, prototyping, and revising, the picture frame is finally ready for deployment in the shop. Last week’s “wrap-up” frame design prompted the comment that most people print 4×6 pictures, not 5×7, leading to some quick dimension changes and the construction of a final prototype. This new frame holds 4×6 pictures snugly (a practical, appealing function), takes about 2 hours to make under ideal circumstances (commensurate with the wall hook), and lowers the cost by almost a dollar, down to $5.02 per frame (coverable by a small lab fee, as discussed in last week’s post).

IMG_3453IMG_3454


IMG_3455

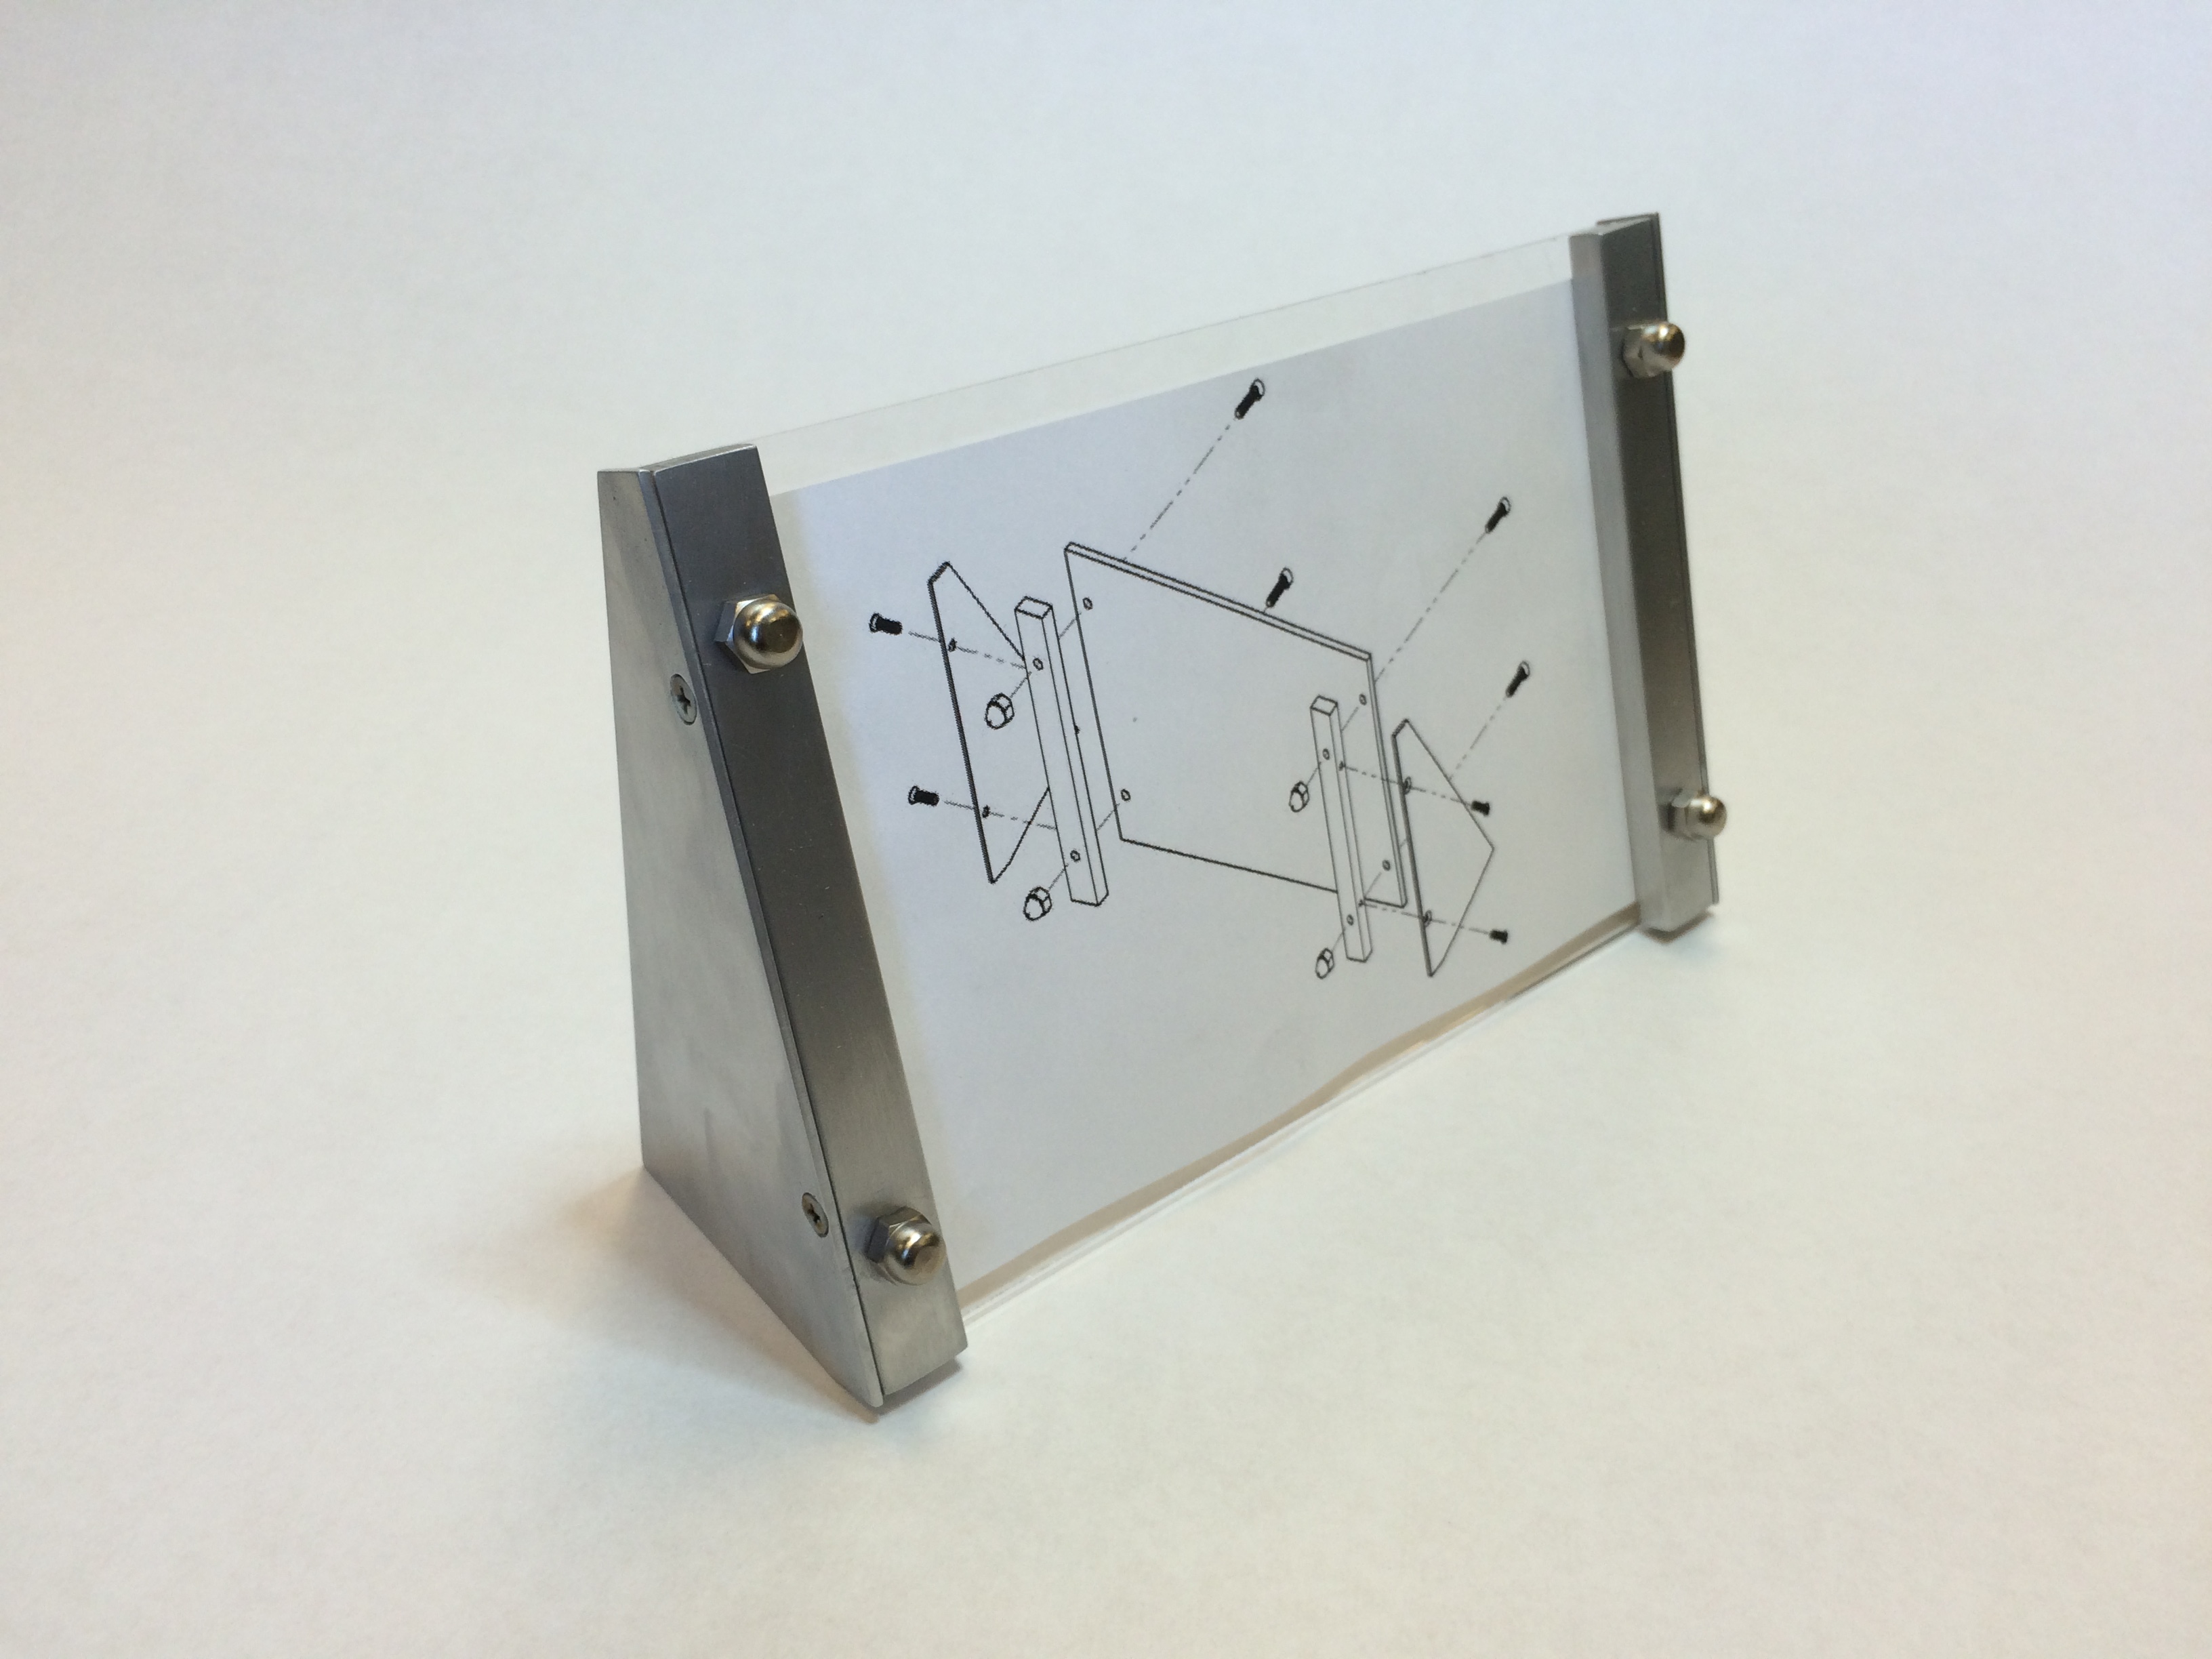
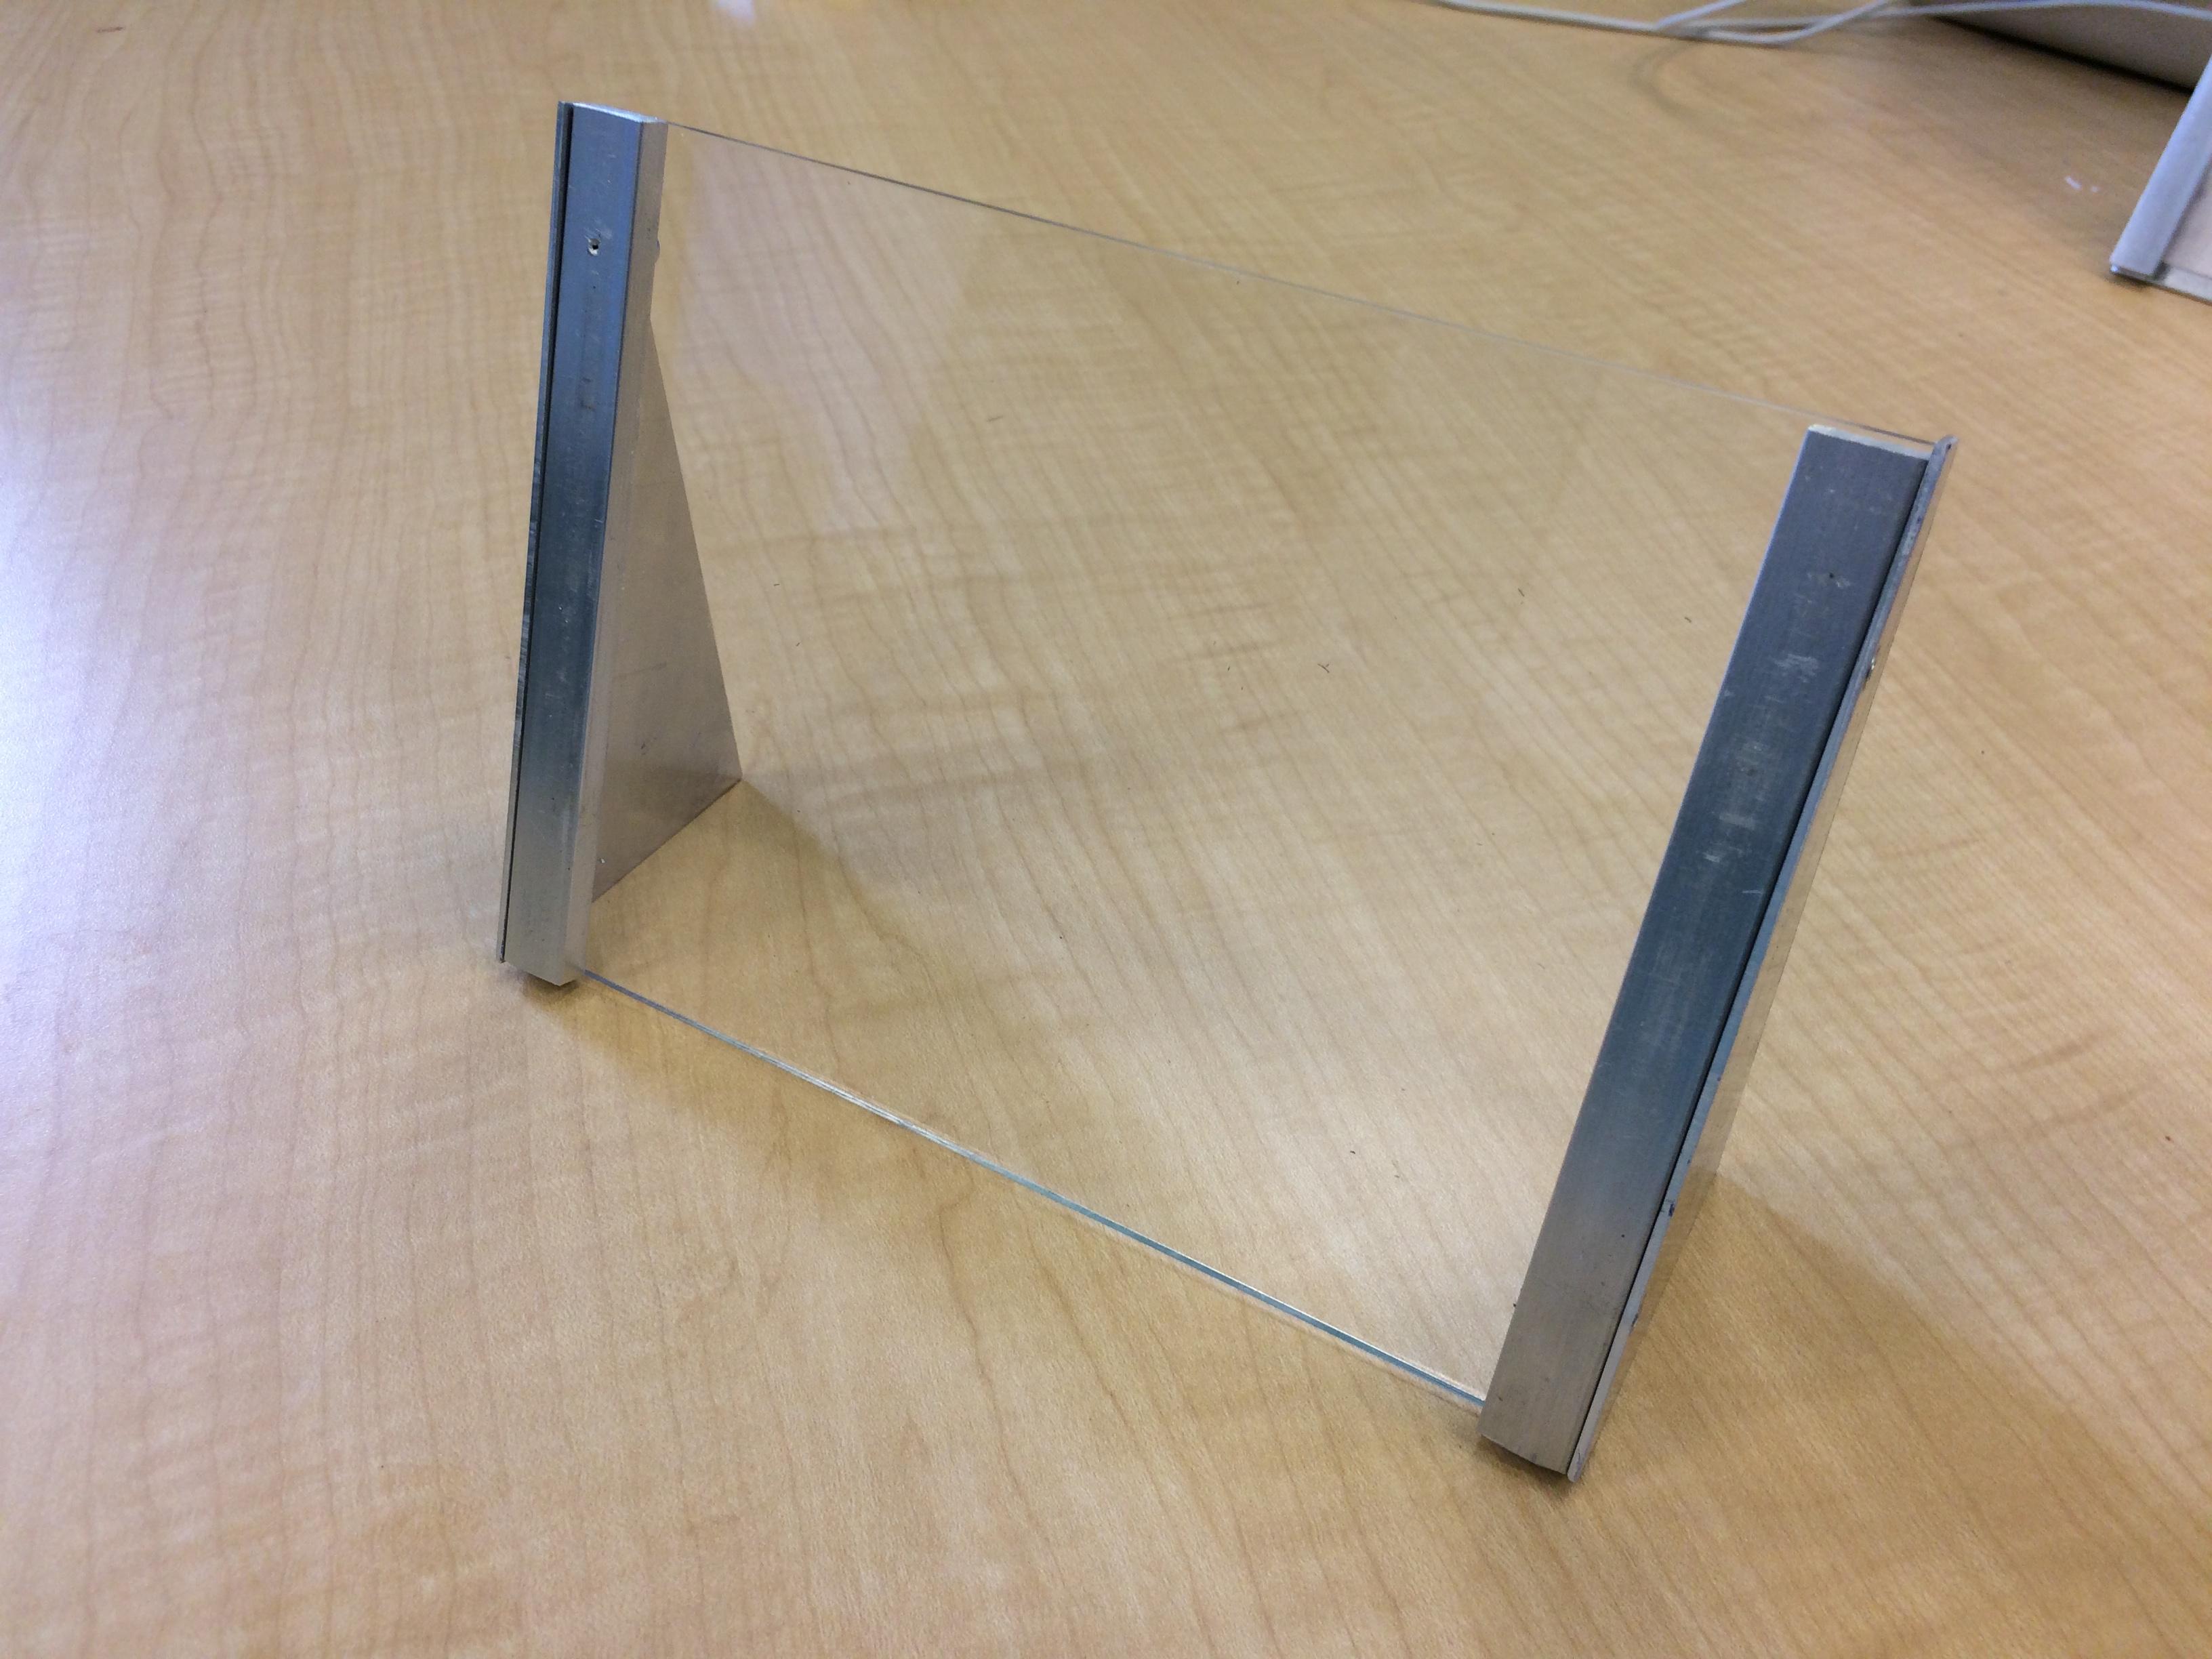
As of now, the picture frame is officially a training option for those looking to use the yellow zone tools. All of this project’s goals were met successfully: the frame adds interest to the project, covers every tool in the yellow zone and incorporates some from outside, and is easily manufacturable by those new to the shop. With luck, these frames will soon grace shelves all across engineering dorm rooms at Tufts.

IMG_3458


Shop Training Update: Wrapping up the Picture Frame

After a third prototype and some experiments with acrylic forming, the picture frame is, I believe, nearing completion. This prototype, shown below, goes for more of a “polished-industrial” feel that hides a larger purpose: the cap nuts securing the vertical frames to the acrylic plate allow for zero-tools insertion of a picture, something that was not possible in the previous two designs and could preclude many students from using their frames.

frame_rev03_exploded IMG_3395

Compared to the wall hook, this frame has several key advantages that I believe make it an ideal shop training project, either as a supplement to the hook or as a complete replacement.

  • Scope: The wall hook required only three yellow zone tools: the horizontal bandsaw, the drill press, and the jump shears. Students used the vertical bandsaw for a single cut, but with the caveat that they weren’t really supposed to use it for what they were doing—an odd thing to say during shop training. The picture frame, by contrast, requires five yellow zone tools, incorporating the hand drill and laser cutter into the original three. Additionally, the plate stock, while cut entirely on the jump shears for the prototype, could be cut properly on the vertical bandsaw with no caveats, thus making for six tools used properly.
  • Variable tool usage: Of the wall hook’s 31 required power tool operations, a whopping 26 of them (84%) took place on one of the shop’s three drill presses. This high percentage of drilling and countersinking operations created major bottlenecks when large numbers of students were trained at once. The picture frame spreads out the tool usage much better, with only 18 of its 32 operations (56%) taking place on the drill press. The plate work on the supports could be split evenly between the jump shears and vertical band saw, reducing bottlenecks even further. The only real potential for a major bottleneck is at the laser cutter, but I believe efficient management of it so that multiple students are trained and cutting their single part at the same time could make its use manageable.
  • Variable parts: The wall hook’s five pieces were all very similar (or, in two cases, exactly the same), each requiring almost the same order of operations. By contrast, each of the picture frame’s three unique components (two components are mirror images) requires a completely different set of skills from the others: the acrylic backing plate is laser-cut; the bar stock frames are cut on the horizontal bandsaw and drilled on the drill press; and the plate supports are cut on the jump shears or vertical bandsaw, hand-drilled, and countersunk on the drill press. And because the drill presses are split, two for drilling and one for countersinking, there is no tool usage overlap between parts as there was with the wall hook. If there is a line at the drill press, those not in line can work on a part that does not require the drill press, something that was not possible with the wall hook.
  • Less tapping: The picture frame has half as many tapped holes as the wall hook, giving students the opportunity to get a feel for the process but giving them fewer chances to break a tap.
  • Interest level: The wall hook perhaps received the most grief because of its lack of utility in a college dorm. Because the dorms forbid screwing into walls, most students could not make use of their hooks, leading to a lack of interest from those students who were not interested in the act of making something. The picture frame, requiring no mounting, presents a desirable end goal for those more results-driven than process-driven.

All of these advantages together, I believe, outweigh the one major disadvantage the picture frame presents: cost. Considering only the cost of materials in the finished product—that is, not accounting for students breaking taps, remaking parts, etc.—the frame costs $5.96, compared with the wall hook’s mere $0.74 price tag. I would argue, however, that the expanded scope and heightened interest level present a compelling case for adopting the picture frame and adding a small lab fee to the course. I believe most Tufts students would be fine paying a small price for a more useful end product; furthermore, it is almost expected in other disciplines here that courses with lab components are going to have a lab fee. For biology or chemistry, these fees can reach into the hundreds of dollars; by contrast, a $5 or $10 fee would seem insignificant, especially if it is clear that it pays for a concrete end product.

Several prospective students on a tour were asked about shop training projects, and while they thought the wall hook was decent and liked the pen holder more, they all agreed that the picture frame held the most appeal for them. I think many students would feel the same, given the choice between something they cannot really use and something that they may already want. And the more concrete advantages only add benefits.

IMG_3402


Shop Training update: picture frame

This week saw great leaps forward on the picture frame, but ultimately proved something of a disappointment. The great leaps: a new design and two prototypes! The drawings showcased in last week’s post were prototyped, resulting in a proof-of-concept model that actually worked fairly well.IMG_3381

This design did turn out to have some issues, however. Most notably, it proved much more difficult than anticipated to accurately bend the frame’s aluminum legs; additionally, the bending process slightly warped the frame’s center sheet, preventing the picture from laying flat.

These considerations—difficulty bending and a warped image support—led to picture frame, rev. B, the designs for which are shown below. It replaces the single bent aluminum sheet frame with two aluminum sheet legs that are screwed into the vertical picture clamps, with the picture backed by a 1/8″ acrylic sheet.

frame_drawings_rev02_p1 frame_drawings_rev02_p2 frame_drawings_rev02_p3 frame_drawings_rev02_p4

As this design did not include any sheet bending, it proved much easier to build using only the tools currently in the yellow zone than the initial design. This new design was prototyped as well:

IMG_3382

As suspected, the new design proved much simpler to build. However, I still believe it fails on two counts. First, it incorporates two tools that are not used in the wall hook: the laser cutter (to cut the acrylic), and the hand drill (to drill the holes in the leg plates). Second, and more important, this design costs over $7 in raw materials, several cents more than the initial design and far more than the $0.50 wall hook. As such, if we were to proceed with this design, we might need to incorporate a “pay-to-play” model, where the wall hook is the default option, but students can pay a materials fee to make something larger.


Shop Training Redesign – Picture Frame-

One of the leading contenders for new shop training project was a picture frame. These drawings are a first pass at designing a picture frame that could be built with the yellow zone tools. It consists of a bent aluminum sheet frame with two aluminum bar stock supports on the front; the picture is inserted by sliding it under the supports and then tightening them down to secure it.

Cost will possibly be a major issue with this design, with initial estimates putting it at more than 8 times more expensive than the wall hook. This extra cost is mostly incurred due to the expense of aluminum sheets, so next steps are to brainstorm ways to cut down on sheet stock usage and then start prototyping.
frame_drawings_rev02_Page_1 frame_drawings_rev02_Page_3 frame_drawings_rev02_Page_2

Revitalizing Malden High School’s Workbenches

One of the largest engineering spaces currently missing from the Tufts campus is a student-accessible wood shop. But over at Malden High School, professors and Tufts students are working to create a fully-equipped wood shop/makerspace in Nedlam’s Workshop, a mere ten-minute drive from Tufts. Several of us spent the last few days there learning about the tools and working to improve the space, cleaning it up and creating new and improved work spaces around the shop. My team’s particular focus was the shop’s four solid maple workbenches, each of them a beautiful butcher’s block work surface covered in years of varnish, paint, and grime. Our task was to clean up and stabilize the decrepit worksurfaces and solidly remount the woodworker’s vices loosely hanging off each bench.

A quick experiment with a planer and then handheld sanders revealed that the built-up coatings were more than a match for our tools. The layers of varnish quickly clogged sandpaper, and hidden nails blocked progress with the planer for fear of chipping the blade. But a much easier solution quickly presented itself: flip the table tops over. Four easily-removed bolts secured each top to the base, and with them out of the waywe found bottom surfaces in near-mint condition. Some wood filler, scrapers, and a little bit of sanding took care of years of holes and gum within minutes.

Our other challenge, then, was to mount the vises. The vises had originally been mounted with lag screws, which, while solid, will (and had) eventually strip out a hole. So instead of screws, we used carriage bolts to secure the vises through the table. The bolt heads were counterbored – sunk into the tabletop so as to sit flush – and secured on the bottom with nuts and washers; additionally, the vise faces were screwed into the table face. This secure mounting mechanism will allow the hardware to be continually re-tightened whenever it loosens, something not possible with lag screws. The finished workebenches were much more solid, smooth, and easily usable – and stylish to boot.

© 2024 Bray Lab

Theme by Anders NorenUp ↑